Article Information
- Digital Object Identifier (DOI): 10.47982/cgc.8.369
- This article is part of the Challenging Glass Conference Proceedings, Volume 8, 2022, Belis, Bos & Louter (Eds.)
- Published by Challenging Glass, on behalf of the author(s), at Stichting OpenAccess Platforms
- This article is licensed under a Creative Commons Attribution 4.0 International License (CC BY 4.0)
- Copyright © 2022 with the author(s)
Authors:
- Wim Stevels - Eastman Chemical
- Thiemo Fildhuth
- Thomas Wüest - Hochschule Luzern, Technik & Architektur Institute of Civil Engineering (IBI)
- Matthias Haller - Solutia Deutschland GmbH
- Roman Schieber - Knippers Helbig GmbH
Abstract
Minimizing metallic primary structures in directly glazed grid shells is key to increasing transparency. Complete renunciation to a substructure results in the glass itself bearing the loads, with thin glass shells, for example, that support loads mainly via membrane forces. A 4.20 m tall, double-curved, frame-less modular glass shell with stainless steel fittings laminated into the thin interstice of two-ply laminated safety glass has been developed and built as a demonstrator to validate the concept. The fittings used to structurally join the glass modules transfer all translation loads and provide a certain rotational stiffness.
They are geometrically designed to reduce stress peaks inside the laminate and feature a laminated contact surface at the edge of the glass. For lamination, an interlayer stack was applied comprising exterior layers of structural PVB to bond the fitting with the glass and translucent PVB as interior core layer for aesthetic reasons. The design of this structure initially relied on generic values for designing and finite element modelling of the fitting-interlayer bond, particularly in tensile “pull-out” mode. The present paper undertakes a review of basic interlayer stack data with regards to viscoelastic properties and adhesion, and the engineering hypotheses using recent preliminary fitting test results for various loading schemes (bending, shear, tensile).
1. Introduction
1.1. General
In grid shell design, reducing or entirely removing the metallic primary structures supporting the glass panels is a major objective to increase the transparency of the overall construction (Schieber et al. 2021). Shell structures provide load bearing behaviour mainly by membrane forces. If a construction is designed as a compression-only shell such as feasible in domes, vaulted structures or free-from shapes (e.g., Block et al. 2017, Oval et al. 2017) the additional advantage of maximum reduction oftensile forces in the glass or in the joints is obtained. Given the sensitivity of glass to breakage in tensile mode, this is particularly relevant for glass structures.
Practical considerations such as safety, dimensions, weight and assembly challenges require that glass shell constructions are built from modules that are structurally connected. Various aspects of modular glass structures have been reviewed by Blandini (2005), Bagger (2010) and Fildhuth et al. (2012a,b). Some elements to consider are joining, joint patterns, glass module shapes and load bearing behaviour. The main problem of the structural connections and their resistance are examined, to name some examples, by Blandini (2005) for adhesive butt joints, Puller (2012) and Kassnel-Henneberg (2020) for laminated point-type fittings and Marinitsch (2015) regarding linear, laminated edge connections.
Recently, the used of embedded connections in a liquid cast-in-place interlayer was explored, but not yet translated to an actual structure (Volakos, 2021). Other differences from this study, apart from the interlayer used, include the use of much larger rectangular fittings (140 * 200 mm) an overall interlayer thickness of 6 mm and review of tensile loading only. Some interesting parametric modelling is included. Clearly, modular shells, their geometrical optimization and structural glass connections are active research topics and are indicative of the importance and the challenges of this field.
In a recent paper, some aspects of these topics were addressed by showing the design, fabrication and assembly process of a demonstrator frameless, modular glass shell structure (FGS) using structural PVB interlayer and laminated fittings (Schieber et al. 2021).
1.2. Design aspects
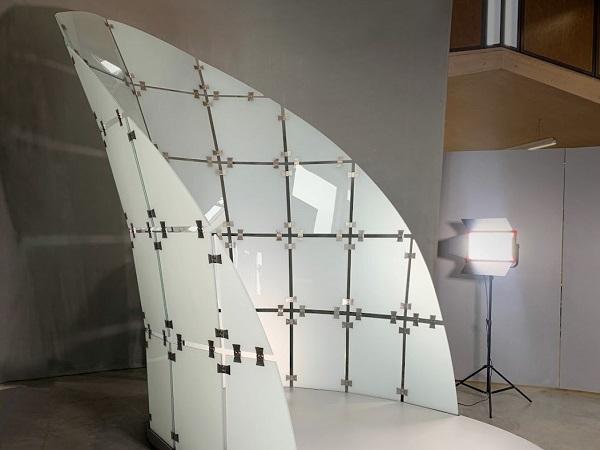
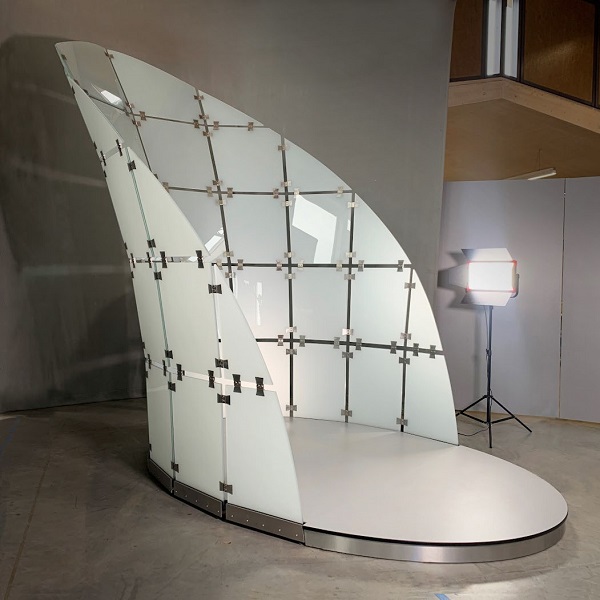
The development of structural interlayers has enabled the design of transparent glass structures whereuse of the mechanical properties of glass is maximized. As an illustration of the practical feasibility of the design options that these interlayers offer, a unique public demonstrator was build using Saflex® Structural PVB interlayer (Figure 1). The stiffness of the interlayer was used in the glass laminate stiffness as a whole and in addition, the potential of glass connections using the structural PVB interlayer for bonding of fittings inside of the laminate was explored.
To maximize the transparency and to expose the necessary glass connections, a frameless shell structure with laminated fittings was designed. To be able to work with a light two-ply laminate, the fitting needs to be laminated into the 3mm thick interlayer interstice between the glass panes. To show the variety of aesthetic design options, a translucent, milky PVB interlayer (Vanceva® Arctic Snow; rheology of conventional PVB type) interlayer was used for the core layers together with the structural PVB (Saflex® Structural; stiff PVB type) as skin layers in the laminate.
The stack build-up and some fitting details are represented in Figure 2. Note that the contact area between the fitting and glass only consists of the structural PVB, and that additional stability of the fitting is created by laminating the T-crossbar of the fitting to the edge of the glass, also using the structural PVB. The T-crossbar provides a sufficient bending stiffness of the fitting about the glass edge to stabilize the shell in assembly, against moments from asymmetric loads and regarding stiffness variation at the joints between the modules.

1.3. Structural and Safety Concept
The frameless glass structure is conceived as a full glass double curved modular shell. The global geometrical shape and joint pattern of the shell are designed to reduce long-term tensile membrane forces in favour of compressive membrane forces, mostly due to dead load. However, limited bending occurs because of the discontinuity zones along the gaps of the joints and from short-term, concentrated or asymmetric and symmetric horizontal loads. As the shell is intended for indoor use, such loads are mainly barrier and impact loads. The safety concept is built on three interacting pillars:
- The shell structure is conceived to support permanent loads mainly via compressive membrane forces. Thus, creep effects in the bond between interlayer and fittings due to tensile load are mostly avoided.
- Local ductile fitting behaviour is achieved by the load-deformation characteristics of the fitting and its bond: Prior to failure by rupture of the metal blade of the fitting, cohesive interlayer failure or full delamination, the deformation exhibits strong non-linear deformation increase without actually failing entirely.
- Global redundancy is provided by the fact that large deformation (e.g., delamination) in the bond of single joints causes the respective joint to elude further loading. In such a case, alternative load paths are established in the structure due to the shell behaviour and a sufficient number of intact connections.
This approach allows to determine the approximate shear in the interlayer used to laminate the fitting and the stress in the thinnest metallic cross section of the fitting blade. This conservative hypothesis neglects the additional effect of the T-crossbar bonded to the glass edges (also with structural PVB, see Figure 2). A more in-depth discussion of the grid-shell concept, the engineering assumptions, modelling and glass laminate manufacture and assembly is provided in a preceding publication by Schieber et al. 2021.
The above hypotheses and numerical analyses are accompanied by physical tests of the fittings subjected to different load scenarios performed at the HSLU in Lucerne, as presented below. This allows to verify the assumptions made and to determine the real load bearing capacity of the fitting connections. The present paper is accompanied by a parallel paper (Fildhuth, 2022)focussing on the fitting connection itself and their test results in detail and on parameter studies performed on it via FEM.
1.4. Study set-up
In the initial design, it was assumed that the interlayer rheological properties of the stack and the adhesion to the glass could be predicted from the constituent interlayers, even if these have different rheology and adhesion. As stress concentrations around the fitting edge are likely to occur, a gradient in interlayer properties from the fitting area - only in contact with the structural PVB – to the area outside the fitting – in contact with the stack of structural and translucent white PVB – could be relevant to failure mechanism of the glass in some deformation modes. Stacked interlayer rheology was studied using dynamical mechanical thermal analysis (DMTA) and adhesion using compressive shear measurements.
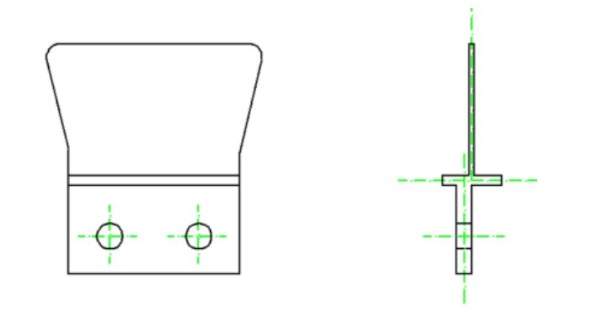
The mechanical characteristics of the laminated fittings were tested in tensile, bending, shear tensile creep and bending creep mode. For testing of the laminated fittings, 42 sample specimens (8mm clear annealed glass| 3 mm interlayer| 8 mm clear annealed glass) were prepared having dimensions of 200 * 550 mm, with the fitting placed centre on either the short side or the long side, as indicated in Figure 3.
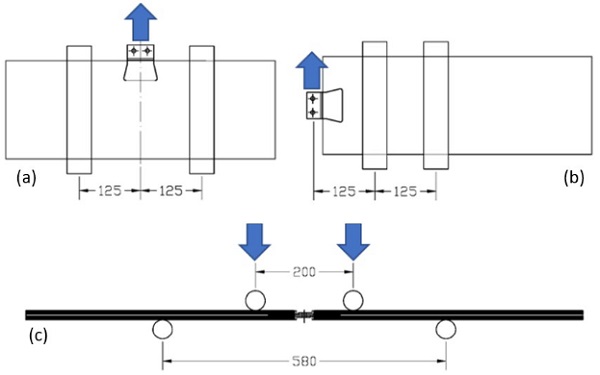
Each fitting had two holes on the non-laminated side, allowing to attach the fitting directly to a tensile tester (tensile and shear mode test) using bolts, or to each other (for bending test) or to set of weights (creep tests). The metal protruding outside the laminates was placed slightly out of centre because of the shear-bolt connection of two glass modules via the overlapping fitting plates. Thus, overall planarity of the glass in bending test is achieved. A detailed fitting schematic is provided in Figure 4.
The fitting details and design are slightly simplified as compared to the actual frameless glass demonstrator: No accommodation for tolerances is required, as there is only a single fitting per test specimen. The exterior part of the fitting with the bolt holes is 28 mm from the crossbar by 54 mmwide, while the laminated trapezoidal fitting extends 41.5 mm into the laminated glass and is 1.5 mmthick. The crossbar that will rest on the glass edge is 3 mm thick. Both for the interlayer and laminated fitting/glass experiments, reference specimens were prepared using only a structural PVB or translucent white PVB.
2. Experimental
Both the properties of the pure interlayer material and of the laminated fitting construction have been analysed via physical tests.
2.1. Dynamic Mechanical Thermal Analysis
Three stacks of 3 mm thick interlayer were prepared using a conventional lamination process by stacking four 0.76 mm interlayer films and preventing adhesion of the interlayers to the glass using non-adhesive films. The stacks build up were respectively: 1) Saflex® Structural (“skin“) + Vanceva® Arctic Snow (“core“) + Vanceva® Artic Snow + Saflex® Structural; 2) four layers of Saflex® structural; 3) four layers of Vanceva® Artic Snow 0.76 mm. Dynamic mechanical analysis (DMA) experiments were carried out using a TA instruments Ares-G2 rheometer on these interlayer stacks using a parallel plate set-up as per ISO 6721-10: 2011, having a diameter of 8 mm. Experimentally, a temperature sweep experiment was executed at 1 Hz from -10 °C to 80 °C, starting far below the glass transition temperature of the interlayers. In the dynamic experiments, the shape of the measured sine wave was monitored to assure that no slippage at the interface of the sample occurred.
2.2. Compressive shear
The generic set-up as described in Jagota et al. 2000 was used. Samples were prepared as in the DMTA sections, except this time the interlayers were allowed to bond with the glass. In addition to the stacks mentioned previously, a stack with a build-up of Vanceva® Arctic Snow (“skin“) + Saflex® Structural (“core“) + Saflex® Structural + Vanceva® Artic Snow was prepared as control. Five pieces of Ø30 mm were cut out of each sample laminated with a Knopp Borfix drill and tested for compressive shear adhesion using an Instron 3367 equipment. Measurements were executed at 21 °C after conditioning for 30 minutes.
2.3. Laminated fitting specimen preparation
The generic description as in Schieber et al. 2021 applies here as well. Fittings were milled from a monolithic block by Kurt Hüttinger GmbH & Co to drawings provided by knippershelbig GmbH. Three stacks of 3 mm total thickness of the interlayer were prepared using a conventional lamination process by stacking four 0.76 mm interlayers. The core PVB sheets with cut-outs for the fitting were laser-cut to fit exactly. The same technology was used for cutting out the “envelops” around the fitting where it is laminated to the glass.
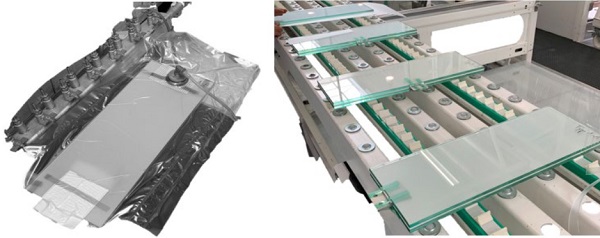
Glass cutting, edge treatment, lay-up and lamination were executed on a commercial line. In contrast to the actual frameless glass demonstrator structure, annealed glass rather than heat-strengthened glass was used for reasons of manufacturability and cost. To maximize uniformity among the test specimens, a vacuum bag de-airing process has been used followed by an autoclave cycle (see also Figure 6). This process reduces the risk of leaving excessive air in the laminate, which could potentially have an impact on the test results. Assembly of the test specimens was executed in a moisture controlled clean room environment , to keep the interlayers within the moisture limits indicated by the manufacturer.
2.4. Mechanical tests
All short-term mechanical tests are performed on a Zwick/Roell 150 kN testing machine at the Building Envelope Competence Center (Prof. Dr. A. Luible) at the University of applied Sciences in Lucerne, For the long-term creep tests, weights were hung from the fitting either in tensile, or in bending for two joined laminates (as in Figure 3c). The specimens were fixed on a custom-made rack. The indoor laboratory temperature during the test was 19°C – 21 °C at 45% relative humidity ±5%. Samples were stored at least 48 hours in the experimentation hall prior to test execution.
3. Results and discussion: DMTA and adhesion
3.1. Dynamic Mechanical Thermal Analysis
In the frameless glass structure a stack of interlayers is used, comprising two outer (“skin“) 0.76 mm structural PVB interlayers combined with two inner (“core“) 0.76 translucent white PVB interlayers.This interlayer will be referred to as “mixed stack” in the following paragraphs and figures. The viscoelastic properties of the latter are approximated by those of a conventional PVB interlayer data, as per the manufacturer’s datasheet (Eastman 2020). It was already shown in prior work (Stevels and D’Haene, 2020; Schuster et al. 2021) that the shape of the modulus curve for structural PVB and conventional PVB are the same in the transition regime, as the PVB base resin and plasticizer used are largely the same. If it is assumed that any gradient in plasticizer concentration across the layers diffuses out during the autoclave process, that occurs well over the glass transition temperature of each individual layer, the viscoelastic properties of the stack can then be modelled from the constituent interlayers. Differences in plateau values near either the elastic or the viscous state may occur due to differences in polymer content.
The assumption of complete plasticizer distribution was verified by comparing modelled G(t) data based on the models of the individual layers or mixed interlayer stack as given in Stevels and D’Haene, 2020 to measured shear storage (G‘) data for the mixed interlayer stacks and the individual interlayers. In Figure 5, the outcome of the temperature sweep experiment at 1 Hz is compared to the model outcome. At this relative short duration G(t) can be approximated by G‘, at least at lower temperatures where the shear relaxation modulus is much larger than the loss modulus. By definition, G‘ is larger than G(t), and the difference increases with increasing temperature.
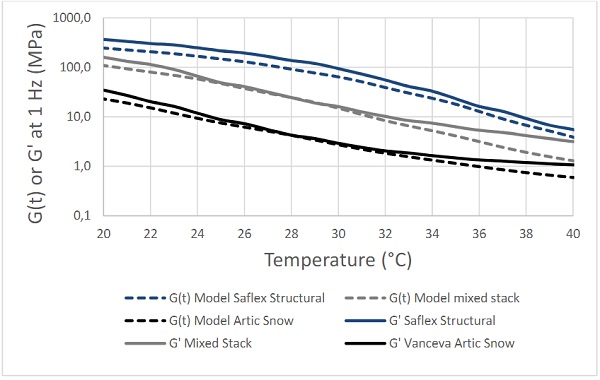
Figure 5 shows that the data for the structural PVB/translucent white PVB stack can indeed be modelled from the constituent interlayers, understanding that the models used were chosen on the conservative side. At higher temperatures G‘, starts to deviate from G(t) more - as the contribution of the loss modulus to the latter becomes more important.
3.2. Adhesion
A number of methods is available to rate or quantify interlayer adhesion to glass, including pummel methodology (Schuster et al. 2020), through-cracked-tensile (Franz 2015) and peel (e.g., Pelfrene et al. 2015) and compressive shear (Jagota et al. 2000). The outcome of most of these determinations is typically not only a function of the interfacial adhesion alone, but also of the bulk properties of the material.
In the preceding paragraph, it was determined that the bulk viscoelastic properties of the stack were different from the individual layers. Structural PVB and conventional PVB are known to have different adhesion levels, regardless of methodology choice. To characterize the adhesion level obtained in the frameless glass demonstrator and test specimen in the mechanical tests described in this work, laminated glass with four different interlayer configurations were characterized using compressive shear methodology:
- Laminated glass with structural PVB only
- Laminated glass with structural PVB skin layers and translucent white PVB core (as test specimens)
- Laminated glass with translucent white PVB skin layers and structural PVB in the core
- Laminated glass with translucent white PVB only
In all test specimens, a 3 mm thick overall interlayer thickness was maintained as well as symmetry relative to the centre of the laminate. Five specimens per configuration were used. The results are provided in Table 1.
Table 1. Compressive shear adhesion of 3mm interlayer stacks as used, and reference configurations.
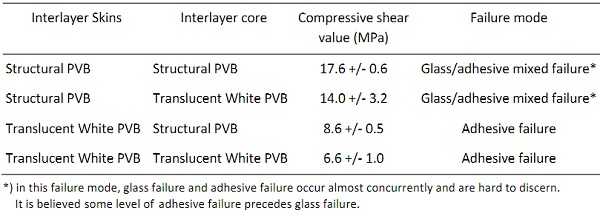
In the interpretation of Table 1, it is important to note that in compressive shear testing, the values obtained are also a function of interlayer thickness and that for conventional PVB, values measured tend to decrease with increasing thickness (data not shown). Thus, the values obtained are not readily compared to values obtained on specimens with a 0.76 mm interlayer thickness. The structural PVB used had a significantly higher adhesion to the glass than the translucent PVB.
For the mixed stack configurations, adhesion seems to be dominated by the skin layer: closer to structural PVB if the skin layer is this product, closer to translucent white if the skin layer is that product. Nevertheless, with the interlayer stack build-up chosen, it means there is a gradient in interlayer stiffness and adhesion at the fitting edge. This may influence the failure mechanism in the mechanical test described over the next paragraphs.
4. Results and discussion: Mechanical tests
4.1. Introduction
A production detail of a laminate with fitting and an overview of the two laminated geometries produced are provided in Figure 6.
The details of the laminated fitting as produced are illustrated in Figure 7 with pictures at different angles, showing e.g. the crossbar laminated to the glass edge.

The mechanical tests will be described by deformation / load application mode: tensile and tensile creep, bending and bending creep, and shear. Please note that the tensile tests mainly transfer the load in the laminate via shear in between the interlayer and the fitting. Without going to in detail here, it was observed that interlayer characteristics were key to failure loads in tensile mode, fitting deformation was key in the bending tests and glass strength in the shear test. Although the outcome of all tests will be provided, emphasis will be on the tensile test as fitting design and material choices, as well as glass strength, were no variables in the test set-up.
4.2. Mechanical tests - tensile
Some of the initial design assumptions for the adhesion of steel to structural PVB in tensile mode for the numerical studies were taken from Louter and Santarsiero (2019). Here, plain metal strips rather than machined fittings were used to characterize pull out forces, and PVB cut-outs were made manually, rather than by laser cutting.
The test set-up used here is illustrated in Figure 8. Tensile experiments were executed at a path-controlled at 1 mm/min, with the clamping brackets positioned 125 mm outside the centre of the fitting. Five test specimens of the stacked configuration were tested, and three specimens for the structural PVB and translucent white PVB specimen only.
Typical force deformation curves for the three different specimens used are provided in Figure 9.
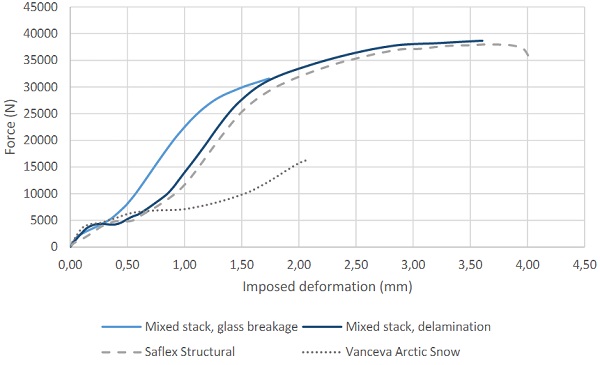
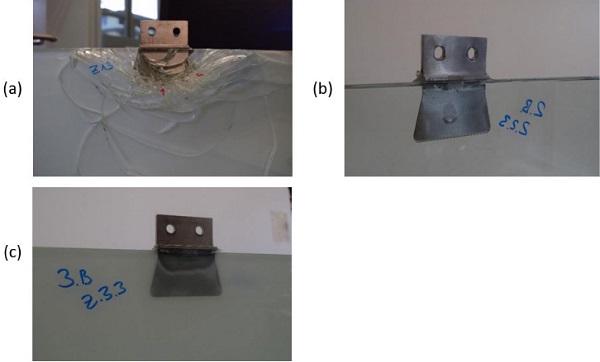
Failure loads of in the 30 - 40 kN range were observed for configurations in which the structural PVB provided the connection between fitting and glass, with a maximum of 38 kN. These failure loads are in range compared to failure loads determined by Louter (16.1 kN on 25 mm wide specimens), i f it is assumed that pull-out force is proportional to fitting width. Failure loads of between 15 and 20 kN were observed for the pure translucent white PVB interlayer. The primary mechanism for initial failure is delamination for the structural PVB and translucent PVB alone, but glass breakage for the mixed stack configuration. Typical failure patterns are provided in Figure 10. It can be assumed that the gradient in interlayer stiffness at the edge of the glass plays an important role in the glass breakage as failure mode.
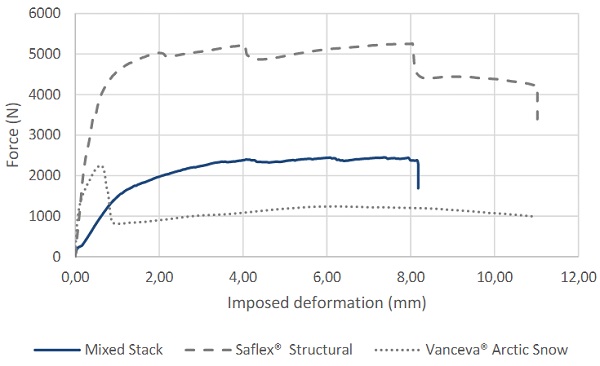
One of each laminate configuration was tested after failure a second time to gain information about the post glass breakage behaviour. All specimens show a considerable post breakage load capacity, see Figure 11 with plateau values of 5 kN for structural PVB, 2 kN for the mixed stack (with glass broken) and 1 kN for the translucent white PVB. All three secondary tension tests were aborted because of high deformations and/or test duration. The specimens did not fail completely with fitting dislodgement.
Thus, general post-breakage behaviour shows ongoing adhesion after glass breakage or delamination; and good ductility and safety behaviour can be assumed. This is encouraging and underlines the structural concept of the demonstrator modular shell, where alternative load paths are activated after a loss in stiffness of a local fitting assembly. The test results mean that the failed fitting connection still may carry some load and that the failed laminates remain jointed without any part becoming detached.
4.3. Mechanical tests - tensile creep
It was determined by FE-modelling that the maximum tensile creep load in the frameless glass demonstrator was 250 N per fitting. Three specimens were loaded with weights equivalent to this 250 N and suspended. A further two specimens were loaded with weights equivalent to 750 N, providing a safety factor of three. Displacement of the fittings was monitored for 40 days at 20 oC. No measurable deformation had taken place at the end of the monitoring period. It was determined that for interior use, tensile creep is not a critical load type to be considered for the frameless glass demonstrator. It is the intention to review creep behaviour at higher temperatures in a future study.
4.4. Mechanical tests - bending
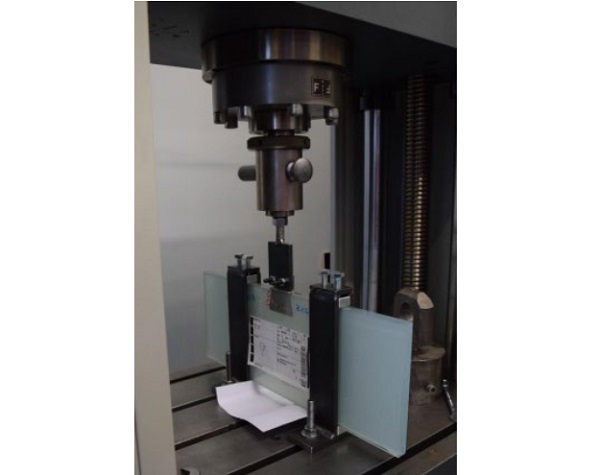
Specimens for bending test were prepared by bolting two laminated fittings test specimens together (“butterfly geometry” – schematic Figure 3c) and positioning them horizontally in the tensile tester, set to in compression mode to execute a four-bonding bending test, as illustrated in Figure 12. The 4-point bending tests were performed at a path-controlled displacement rate of 10 mm/min. Three specimens of the stacked structural/translucent white PVB configuration were tested, as well as single specimen comprising either only structural PVB or translucent white PVB.
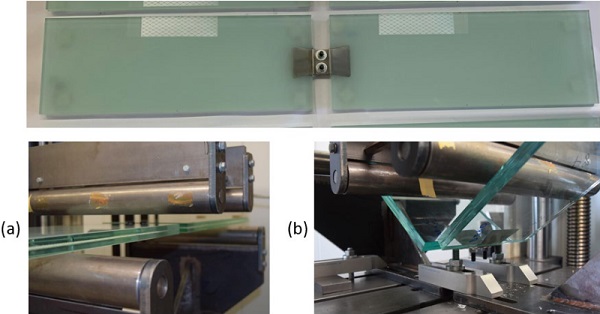
The bending tests are characterized by 3 phases (see Figure 13). Initially, a linear behaviour is observed, due to stainless-steel bending moment in the fitting over approximately the first 5 mm of displacement in this test set-up. In the second phase, plastic behaviour with irreversible fitting deformation due to the stainless-steel bending moment in the fitting occurs, up to approximately 60 mm of displacement (see Figure 14). In the final phase, contact of the fitting T-bar with the other bolted fitting starts to occur up to the point of failure or reaching maximum deformation of the specimen in the equipment (around 140 mm displacement).
All configurations show a ductile behaviour and failure is observed only with high deflection, at very high rotational deformation in the joints. No case with complete loss of connection contact at the joint was observed. For the configuration with the mixed stack interlayer, the maximum forces obtained at glass breakage were between 15.6 and 17.7 kN. For the structural PVB interlayer, no failure occurred up to the point of maximum displacement, at 23 kN. For the translucent white PVB interlayer, failure due to interlayer delamination occurred at 1.1 kN.
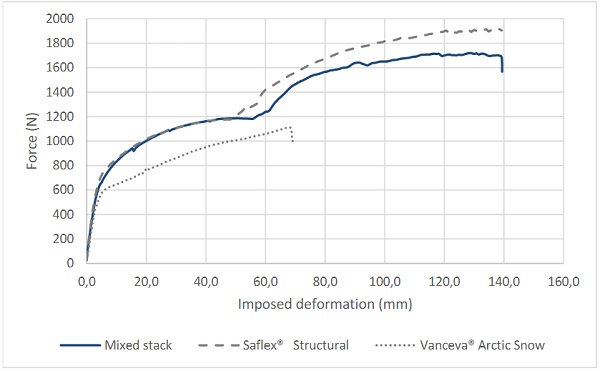
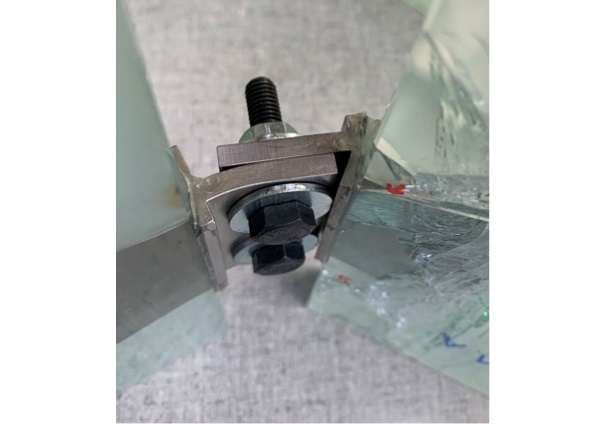
Although there are too few results to make general conclusions, it is interesting that both in tensile and in bending the mixed stack configuration seems more prone to glass breakage than for the individual interlayer specimen. A potential cause has been discussed in the section on deformation in tensile mode. In the actual frameless glass structure demonstrator, heat-strengthened glass has been used, as opposed to the annealed glass used here. Heat-strengthened glass has a much higher resistance to local stresses than annealed glass.
Plasticisation of the stainless-steel fittings initiates the main inelastic rotation of the joints. However, the steel does not fail prior to delamination or glass breakage.
4.5. Mechanical tests - Bending creep
Mechanical bending creep test were executed by hanging weights from the fitting in the geometry as schematically depicted in Figure 15. The distance between the supports, which are placed at the centreon each individual laminated glass specimen, is 580 mm, at an overall with of the joint specimen of 1140 mm. Thus, no bending from the specimen self-weight acted upon the joint.

A vertical load of 50 N suspended from the fitting was determined to represent the maximum bending at the fitting connection observed in the FE-model of the demonstrator. Two specimens were loaded with weights equivalent to this 50 N and suspended. A further specimen was loaded with weights equivalent to 250 N, providing a safety factor of five. Displacement of the fittings was monitored for 40 days at 20 oC.
The two specimens at the design load exhibited a displacement of 1.6 and 1.9 mm respectively, resulting in a rotation of approximately 0.4o per laminated glass pane. The panels loaded to 250 N showed a much higher deformation of 24 mm after 40 days, at an angle of 4.7o. In this case, some cavitation bubbles started occurring between the fitting and glass surface, as the onset of a delamination process.
At the design loads of frameless glass demonstrator, no failures due to bending creep are expected, and the small deformations measured here are compensated in the structure by the overall rigidity of the grid shell and its fixation to the structure base.
4.6. Mechanical Tests - Shear
The test set-up used is illustrated in Figure 16. Shear experiments were executed at a path-controlled at 1 mm/min, with the clamping brackets positioned 125 mm from the glass edge and the second clamp 125 mm from the clamp nearest the edge. Three specimens of the stacked structural/translucent white PVB configuration were tested, as well as single specimen comprising either only structural PVB or translucent white PVB.
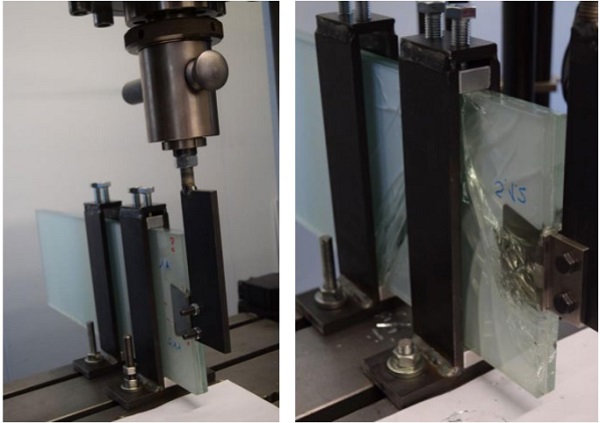
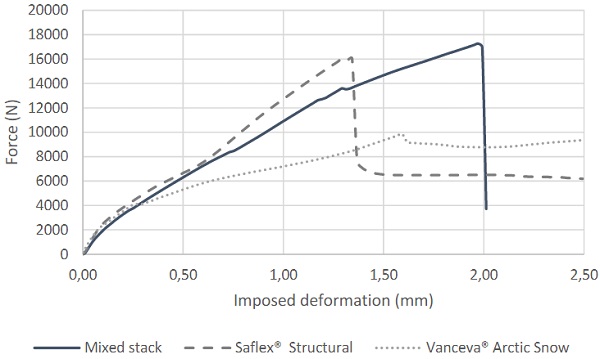
As shown in Figure 17, a close to linear response of force to displacement was observed until glass breakage, at displacements < 2.5 mm. In all cases, the failure was glass breakage starting at the front edge near the fitting. Due to minor imperfections in the lamination of the fitting, or excess interlayer material, as well as differences as in the installation/clamping of the specimen into the setup, differences in initial stiffness in these tests occurred. Near perfect alignment of the glass edge near the laminated fitting is important, as an off-set edge will result in early failure of the protruding edge in this deformation mode.
Failure loads ranged from 12.5 to 19.4 kN for the mixed stack configuration, 16.1 kN for the structural PVB interlayer and 9.9 kN for the translucent white PVB interlayer. All breakage patterns were similar for these configurations in shear deformation. Given that the test outcome seemed largely driven by the resistance of the glass edge to local stresses and the sensitivity to alignment, it was decided to not use more test specimen in this deformation mode. In the frameless glass demonstrator, shear failure as primary mechanism seems unlikely, and the shear loads encountered in the FE-model were significantly smaller than the failure loads encountered in the shear test. As a secondary failure mechanism, in combination with other or accidental load types, a minimum shear resistance of 10 kN is more than enough to provide safe failure if any of the fittings is loaded in shear mode.
5. Conclusions & Outlook
The demonstrator and all analyses and processes necessary for its successful completion show the potential of using structural PVB for load bearing connections and for lamination in full glass shell structures. Furthermore, it has been shown that multilayer laminates with different PVB types are applicable. In this contribution, it has been shown that the viscoelastic properties of PVB interlayer stacks with different properties can be modelled from the constituent PVB materials under certain conditions.
The presence of a viscoelastic gradient around the fitting may influence the mode of failure in tensile and bending mode and an even more stable structure would have been created had only the structural PVB been used. Based on the mechanicals test on the laminated fittings, it could be shown that the engineering assumptions made in the design of the frameless glass demonstrator are on the conservative side, and that the ductile concept is applicable. In addition, the fitting connection exhibits a robust post breakage behaviour and the initial failure of the fitting connection in tension, shear or bending does not result in detaching or loss of contact.
Complimentary to this largely experimental work, parameter studies using finite element models were made to explore the influence of the fitting geometry, dimensions, interlayer properties and loading type on the structural behaviour of this type of connection (Fildhuth et al., 2022). Future research and development studies and projects are undertaken for an application in thermal envelopes with IGU and for optimising the shell structures, the joints and the feasible geometrical shapes.
References
Bagger, A.: Plate Shell Structures of Glass. Studies leading to guidelines for structural design. Dissertation, DTU Civ. Eng., Lyngby / DK, 2010
Blandini, L.: Structural Use of Adhesives in Glass Shells. Dissertation D93 at the ILEK, University of Stuttgart, Beuren 2005.
Block, P., Van Mele, T. et al.: Beyond Bending - Reimagining Compression Shells, Edition DETAIL, Munich, October 2017.
Eastman Chemical Company: Product Technical Data - Saflex® Structural (DG) - Polyvinyl Butyral Interlayer. Springfield, Massachusetts, 2020
Fildhuth, T., Knippers, J.: Layout Strategies and Optimisation of Joint Patterns in Full Glass Shells. Challenging Glass 3 –Conference on Architectural and Structural Applications of Glass, Bos, Louter, Nijsse, Veer (Eds.), TU Delft, June 2012.
Fildhuth, T., Lippert, S. et al.: Design and Joint Pattern Optimisation of Glass Shells. Conference proceedings IASS 2012, Seoul, Mai 2012.
Fildhuth, T., Joos, P., Yersin, A., Stevels, W.: Development and Behavior of a Thin Fitting Connection for Lamination with Structural PVB Glass Struc. Eng. 7:xxx-yyy (2022)
Franz, J., Schneider, J.: Through-cracked-tensile tests with polyvinylbutyral and different adhesion grades, in Proceedings to Engineered Transparency pp. 135-142, TU Darmstadt/Dresden (2014)
Jagota, A., Bennsion, S., Smith, C.: Analysis of a compressive shear test for adhesion between elastomeric polymers and rigid substrates Int. J. Fracture 104: 105–130 (2000)
Kassnel-Henneberg, B.: Konstruktiver Glasbau - Sonderlaminate. Bischoff, M.; Scheven, M.v. et al. (Hrsg.): Berichte der Fachtagung Baustatik - Baupraxis 14, IBB, Universität Stuttgart. März 2020. pp. 295-302.
Louter, C., Santarsiero, M.: Metal-to-Glass Bond Strength of Structural PVB. GPD Glass Performance Days, Tampere, 2019, pp 49 – 55.
Marinitsch, S.: Stabilitätsprobleme bei Faltwerken aus Glas. Dissertation, E206 - Institut für Hochbau und Technologie, TU Wien, 2015
Oval, R., Rippmann, M. et al.: Patterns for Masonry Vault Design, Proceedings of the IASS Symposium 2017, Hamburg, 2017.
Pelfrene, J., Van Dam, S., Van Paepegem, W.: Numerical analysis of the peel test for characterisation of interfacial debonding in laminated glass Int. J. Adhesion and Adh. 62:146-153 (2015)
Puller, K.: Untersuchung des Tragverhaltens von in die Zwischenschicht von Verbundglas integrierten Lasteinleitungselementen. Dissertation, ILEK, Universität Stuttgart, 2012.
Schieber, R., Fildhuth, T., Haller, M., Stevels, W.: Building a frameless glass structure with structural PVB interlayers and stainless steel fittings, in Proceedings to Engineered Transparency pp. 163-181, Ernst & Sohn Berlin (2021)
Schuster, M., Schneider, J., An Nguyen, T.: Investigations on the execution and evaluation of the pummel test for polyvinyl butyral based interlayers Glass Struc. Eng. 5:371-396 (2020)
Schuster, M., Thiele, K., Schneider, J.: Investigations on the viscoelastic material behaviour and linearity limits of PVB, in Proceedings to Engineered Transparency pp. 207-223, Ernst & Sohn Berlin (2021)
Stevels, W., D’Haene, P.: Determination and verification of PVB interlayer modulus properties in: Online proceedings to Challenging Glass 7, 2020, Gent, Belgium.
Volakos, E., Davis C., Teich, M., Lenk P., Overend, M.: Structural performance of a novel liquid-laminated embedded connection for glass Glass Struct. Eng. (2021) 6:487–510 https://doi.org/10.1007/s40940-021-00162

