Author: Luc Moeyersons
This information corresponds to our current knowledge on this subject. It is offered solely to provide possible suggestions for your own experimentations. It is not intended, however, to substitute for any testing you may need to conduct to determine for yourself the suitability of our advice for your particular purposes.
This information may be subject to revision as new knowledge and experience become available. Since we cannot anticipate all variations in actual end-use conditions, LAMI-Solutions makes no warranties and assumes no liability in connection with any use of this information.
Nothing in this publication is to be considered as a license to operate under or a recommendation to infringe any patent right.
TABLE OF CONTENTS
1. Introduction
1.1. Stages of production
1.2. Comments
2. Preparation of glass
2.1. Stages of production
2.2. The glass
2.3. Unloading the glass
2.4. Cutting the glass
2.5. Breaking out of the glass
2.6. Seaming
2.7. Washing
2.8. Separating Agent
2.9. Ceramic band
2.10. Coated glass
3. Bending the glass
3.1. Sag bending
3.2. Press bending
3.3. Press assisted bending
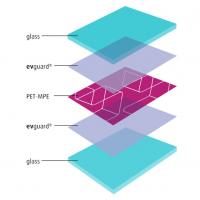
4. PVB Preparation
4.1. Stages of preparation
4.2. Interleaved – Refrigerated
4.3. Packaging
4.4. Unwinding the roll
4.5. Adhesion & Moisture control
4.6. Stretching
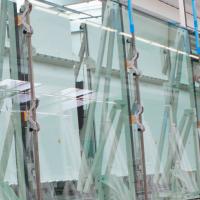
5. Assembly
5.1. Preparation of glass
5.2. Assembly room
6. Prepressing
6.1. A look at different processes
6.2. vacuum ring process
6.3. vacuum bag process
6.4. Roller process
6.5. Ovens in use
6.6. Edge sealants
6.7. Use of clips
6.8. Windscreen stacking
7. Autoclaving
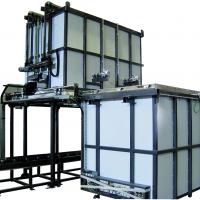
7.1. A look at different autoclaves
7.2. The purpose of autoclaving
7.3. Operational parameters
7.4. Risk of volatiles evaporation & autoclave fires
7.5. The ideal “practical” autoclave cycle
7.6. Possible autoclave cycle improvements
7.7. Recommended precautions
8. Windscreen finishing
8.1. Encapsulation
8.2. Trimming of excess PVB
9. Inspection
9.1. Defects in the glass
9.2. Defects in the PVB
9.3. Defects in the laminated glass
9.4. the shape of the windscreen
9.5. Laboratory testing
10. Lamination Defects
10.1. Bubbles
10.2. Bubbles: Rule of thumb on root cause
10.3. Delamination
7. Autoclaving
7.1. A look at different autoclaves
◦ All autoclave designs can be different:
- Heating by heat exchange (oil), or electrical elements.
- Direct pressurisation from compressors or from a compressed air receiver.
- Vertical or axial air flow.
- Interior or exterior insulation.
7.2. The purpose of autoclaving
◦ To dissolve the residual air and moisture in the PVB.
◦ The air moves by diffusion:
- Exponentially with temperature.
- Linearly with pressure and time.
◦ The solubility of the air in the PVB is 6.4 x 10 -4 cm 3 /cm 3 PVB/cm Hg (normal temperature and pressure)
◦ The air is highly soluble in the PVB.
◦ Bonding of the PVB to the glass:
- Adhesion is obtained by contact.
- The effect of the different thermic cycles and autoclaves on the adhesion of the PVB is minimal.
◦ Temperature:
- Ensures PVB flows and adopts to glass.
- Eliminates surface roughness.
- Sets the final intimate contact and adhesion.
◦ Pressure:
- Keeps the glasses in position.
- Increases solubility of dissolved volatiles, allowing to reach high temperatures without bubble-formation.
◦ Time:
- Needed to achieve the set conditions equally at all laminates in the autoclave.
◦ Note: during the autoclave cycle, compressed air diffuses into PVB-edge and needs app. 96 hours, at room temperature, to diffuse out.
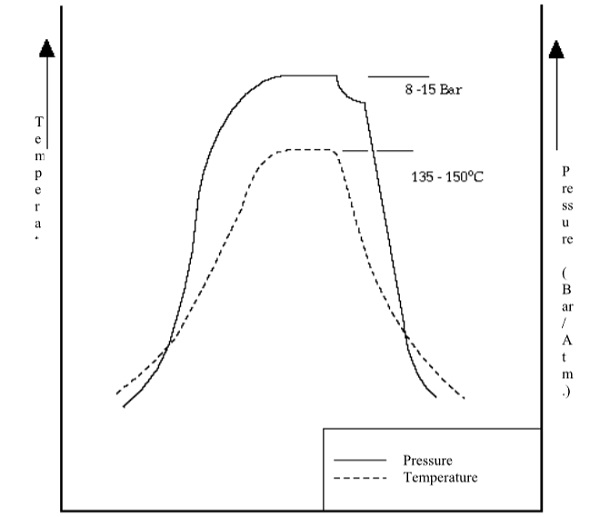
7.3. Operational parameters
◦ Temperature: 135 to 145 deg C
◦ Pressure: 8 to 15 Atm (Bar)
◦ Time: 30 min. to 4 hrs.
◦ Air turbulence:
- Can create glass breakage (mainly at autoclave door)
- Low velocity air can cause:
“Hot points”
PVB flow
Poor heat exchange.
7.4. Risk of volatiles evaporation & autoclave fires
◦ The plasticizer evaporates during the autoclave cycle.
◦ Plasticizer condenses in the insulation, forming a good fuel. (see also “Architectural Glass – Laminating Guide part 5 chapter K – Autoclave cleaning/purging cycle)
◦ Dowanol® TPM.
7.5. The ideal “practical” autoclave cycle
7.6. Possible autoclave cycle improvements
To reduce the risk of edge defects, one could decide to modify the autoclave cycle into a “Olson-Fitzgerald-cycle”.

The autoclave is heated without pressure.
Pressure is added from 60° C onwards, till 3.5 bar.
This way one obtains a 3rd nip, improving the edge sealing.
The 3.5 bar pressure is maintained for at least 20 minutes while heating still continues.
After (minimum) 20 minutes the pressure is increased.
The goal is to reach maximum temperature and pressure at the same time (energy efficiency).
Maximum temperature and pressure are held in line with advised time.(minimum 20 minutes).
When the cooling is started, one would expect an automatic reduction of pressure (adiabatic pressure drop) of app. 2 bar. Some autoclaves are set to compensate for this pressure drop.
If the autoclave is equipped with an automatic pressure compensation, one could program a 2-bar pressure drop over the cooling step.
Maintaining pressure (at its maximum setting) is not really needed and is rather costly (high pressure step).
Pressure should drop when 40° C autoclave air temperature is reached (over a longer time > 5 minutes).
7.7. Recommended precautions
◦ Accumulation of plasticizer (and Dowanol®) on the inside of the autoclave should be avoided.
◦ Regular steam cleaning or heating up to maximum processing tempearture with pressure release valve open and pressure setting at 0.5 Bar.
◦ Avoid all possibility if liquid collection:
- eliminate insulation at the bottom of the autoclave.
- Windscreen clips or separators.
- The rails and wheels of the trolleys
◦ Avoid all other sources of ignition:
- Paper.
- Cleaning cloths.
- Gloves.
- Wood separators or straps.
- Plastic of an inferior quality or separators or straps with a plastic layer around them.
- Avoid the introduction of plasticizer “equivalents”.
- An inadequate compressor filter system can cause oil “leaks” from the autoclave compressor.
8. Windscreen finishing
8.1. Encapsulation
Polyurethane rim around the windscreen.
(injection moulding)
Perfect bending is necessary
8.2. Trimming of excess PVB
- To remove the bead.
- Cosmetic.
9. Inspection
9.1. Defects in the glass
◦ Scratches
◦ Inclusions
◦ Chips
◦ Glass mismatch
9.2. Defects in the PVB
◦ Inclusions (high intensity illumination)
◦ Optical distortion
9.3. Defects in the laminated glass
◦ Bubbles-recuperation
◦ Edge defects:
- Short vinyl
- Edge penetrations
9.4. The Shape of the Windscreen
9.5. Laboratory testing
10 . Lamination Defects
(see also architectural Glass – Laminating Guide – Part 7: Most Common Laminating Defects and Origin).
10.1. Bubbles
10.1.1. Inside the windscreen:
There is no opening towards the edges.
Causes:
- Glass mismatch.
- Poor prepress (speed, pressure, temperature)
- Poor vacuum (inadequate vacuum, premature edge sealing)
Repair:
o Large bubbles - No
o Bubbles away from the edge - No
o Small bubbles close to the edges:
- remove the air with a syringe (?)
- PVB injection (?)
- Re-autoclaving is necessary (clips are commonly used)
10.1.2. On the edge of the windscreen:
Causes:
- Autoclave Short Vinyl: The PVB flows to fill the bending mismatches: Re-autoclaving exacerbates the problem
- Air penetration during autoclaving: Poor edge sealing at the prepress stage.
- Pressure released at too high temperatures.
Prevention:
- Good quality bending and prepressing.
- Improvement of the autoclaving cycle.
- Edge sealants.
Repair:
- PVB injection, re-autoclaving
10.2. Bubbles: Rule of thumb on root cause
- Bubbles further away than 2 cm from the glass edge are caused by premature edge seal.
- Bubbles closer than 2 cm from the glass edge are caused by imperfect edge seal (compressed air penetrated in between glass and PVB).
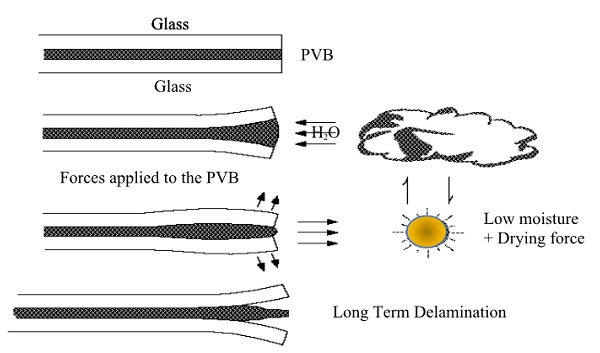
10.3 Delamination
◦ 10.3.1. Inside the windscreen:
- Caused by massive amounts of trapped air
- No repair possible
- Prevention: improve the quality of the bending and/or prepressing
◦ 10.3.2. At the edge of the windscreen:
Several causes:
* Edge pinching (with clips) (during autoclaving)
* Poor adhesion and bending mismatch.
* Solvent or moisture attack.