Authors: Miriam Schuster, Jens Schneider & Tuong An Nguyen
Source: Glass Structures & Engineering | https://doi.org/10.1007/s40940-020-00120-y
Abstract
Laminated safety glass (LSG) is increasingly used as structural element in buildings. Of central importance for safety are the adhesion and the residual load-bearing capacity in the post fractured state. In literature a large number of tests to assess adhesion is mentioned. These include, e.g. peel tests, through-cracked-tensile/-bending tests, VW-pull tests and compressive shear tests. However, especially in industry, the Pummel test is widespread for determining the quality of adhesion in LSG with polyvinyl butyral based interlayers. This test method proves to be simple and quick to carry out: The laminate is stored at − 18 °C and then completely destroyed at room temperature with hammer blows.
The adhesion level (0–10) is determined by visually comparing the adhering glass fragments with reference pictures or with the help of diagrams and tables which indicate the Pummel value as a function of the free film surface. Pummel value 0 is to be interpreted as no adhesion and Pummel value 10 as very high adhesion. Due to the lack of standardization, the execution and evaluation is very much dependent on the test institution and executive person. This paper shows different Pummel classifications that can currently be found on the market. Subsequently, approaches to the automatization and standardization of the execution and especially the evaluation of the Pummel test are shown. Three image evaluation methods in Matlab are presented, discussed and compared: (1) analysis of binary images, (2) statistical evaluation of the greyscale images and (3) texture analysis using co-occurrence matrices.
Introduction
Laminated safety glass
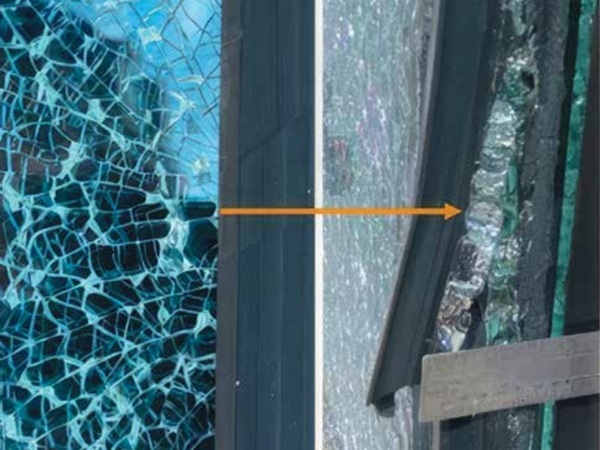
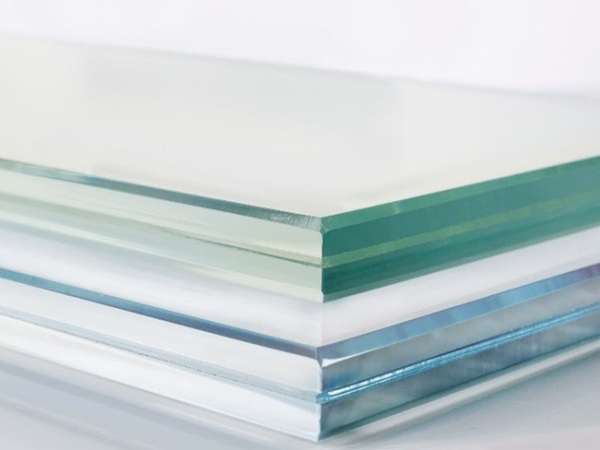
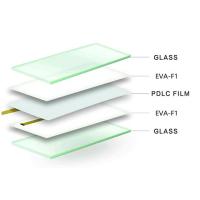
The use of glass in the building industry has risen sharply in recent years with the ongoing architectural trend towards transparent structures. In this context, the glass must increasingly meet safety-relevant requirements with regard to breakage and post-breakage behaviour. The unannounced failure of the brittle material glass is countered by the use of laminated safety glass (LSG). According to EN ISO 12543-2 (2011), laminated safety glass, consisting of two or more glass panes that are laminated together to form a package by means of polymer interlayers, must bind the resulting glass splinters after glass breakage and enable a residual load-bearing behaviour of the glazing.
Accordingly, the adhesion between glass and film plays a decisive role. In laminated safety glass with low to no adhesion, the glass pane will delaminate and after glass breakage the glass splinters do not stick on the interlayer. Contrary, a very high adhesion results in a quasi-monolithic brittle failure of the laminate. The film adheres so strongly to the glass surface that elastic deformations are only possible to a limited extent and the impact energy cannot be dissipated. With an optimal degree of adhesion, the interlayer has a splinter-binding effect and can partially detach from the glass plate so that the impact energy can be absorbed and the glass fragments will continue to adhere to the film.
Application situations in which laminated safety glass is required are, for example, when the glass is used for fall protection, can be walked on, is used as horizontal glazing with the traffic area underneath (overhead glazing) or as a structural component (e.g. as a glass beam). The most common interlayer products in building industry are polyvinyl butyral (PVB)-based with a market share of over 90%. Other interlayers include ethylene vinyl acetate (EVA) and ionoplastics (SentryGlas®).
This article deals exclusively with laminated glass where PVB interlayers are used. The adhesive behaviour between glass and film will be discussed in more detail in the following sections.
Adhesion
First the production process of laminated safety glass is briefly explained. The first step in the production of laminated safety glass consists of cutting of the glass sheets to the desired size, edge processing and cleaning. The previously air-conditioned interlayers are then cut and the laminate is layered. This inevitably leads to air inclusions between the film and glass, which are mostly removed in the pre-lamination process using rollers in heating tunnels, where PVB and glass are heated to 35 °C and 60 °C and using a negative pressure of − 0.6 to − 0.9 bar. In addition, the edges are sealed in this process step to prevent air from penetrating the sandwich. After the pre-laminate production, the adhesive effect between film and glass is already given, but small air inclusions can remain. These are dissolved by the final laminate production in the autoclave at a temperature of approximately 135 °C and a pressure of maximum 14 bar.
The bond between PVB and glass is characterized by dense reversible hydrogen bonds between the polyvinyl alcohol in PVB and the silanol group in the glass, see Fig. 1. Accordingly, the degree of adhesion can be controlled via the film composition, e.g. the content of polyvinyl alcohol, the presence of adhesion-regulating additives or the interlayer moisture content. In (Ensslen 2005) the optimum moisture content of 0.45% ± 0.07% in the PVB-based film is given. This range remains largely constant at a relative humidity of 30%. At a relative humidity between 50 and 70%, the water content in the film increases linearly. From a water content of 1%, the adhesive bond deteriorates enormously and from 2% the film becomes milky cloudy. In addition to the film properties, other factors also have a considerable influence on adhesion.
If the glass panes are not cleaned properly, grease and limescale may be present on the surface and thus prevent hydrogen bonding. Kuraray (2012) recommends distilled or fully desalinated washing water, since alkaline earth ions (Ca++ and Mg++) reduce the glass adhesion even at low quantities enormously (Keller et al. 2002; Kuraray 2012). The glass surface roughness also has an influence, since a rough microstructure favors mechanical interlocking. Since the tin side of glass has a smoother surface structure and can present Sn++ ions, usually a slightly lower adhesion than the air side is observed. Finally, errors in the lamination process may result in air bubbles between the interlayer and glass, which prevent flat contact between glass and film and therefore lead to insufficient adhesion levels.
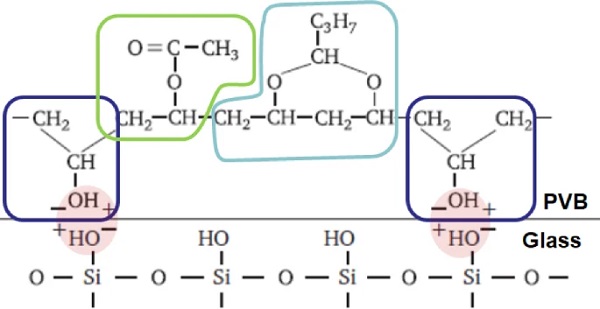
Adhesion and post-fractured tests
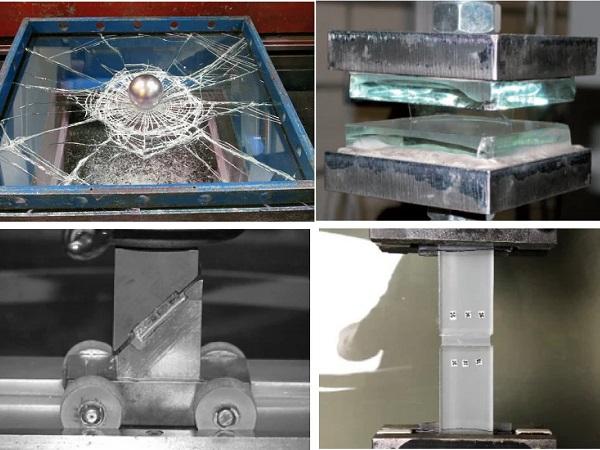
There are various test methods in the construction industry for quantifying the adhesion between glass and polymer. Besides the ball drop test and the pendulum impact test, the tests are not standardized, so that differences are possible in their performance (Schneider et al. 2016). In this section, the adhesion tests are briefly explained, whereby the Pummel test is dealt with in more detail with regard to the procedure and the advantages and disadvantages.
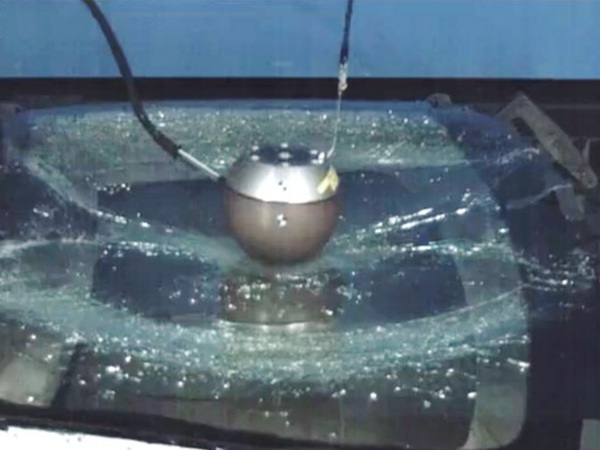
The ball drop test (Fig. 2a) is regulated in the German Standard DIN 52338 (2016) and the European Standards EN 14449 (2005) and EN 356 (1999). In this test a defined steel ball falls from a certain height onto the laminated safety glass. It is evaluated whether the ball penetrates the glass. Additionally the mass of the detached glass splinters is evaluated. The pendulum impact test (Fig. 2b) according to the European Standard EN 12600 (2003) is an impact test similar to the ball drop test. Here, the double-tyre pendulum with different drop heights simulates the impact of a person at different speeds. The test is considered to be passed if none of the specimens breaks or breaks in a non-hazardous manner. For the latter, the result is defined by the weight and size of the glass fragments.
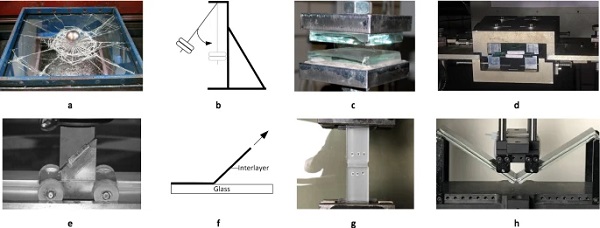
In the compression shear test (Fig. 2e), the adhesion resistance between glass and foil is determined at room temperature in a universal testing machine, where the sample, which is clamped at an angle of 45°, is loaded both in compression and in shear. The maximum shear force until breakage is a measure of adhesion (Kuraray 2012; Schneider et al. 2016).
The adhesive tensile test, also known as the VW Pull Test (Fig. 2c), was developed as an alternative to the compression shear test. The LSG sample is joined to a steel plate and then clamped into a universal testing machine. During the test procedure the plates are separated at a constant speed at room temperature. The force is applied until the glass plate is released from the foil. The adhesive tensile strength is calculated via the technical/engineering breaking stress (Franz 2015).
In the adhesive shear test (Fig. 2d), laminated safety glass samples are subjected to a shear test until the glass plate has detached itself from the foil (Franz 2015). Compared to the adhesive shear test, the adhesive tensile test is much more complex. The sample preparation with bonding is time-consuming and requires extreme accuracy (parallelism of both metal anvil plates). In addition, the glass panes must be separated from the steel plate after the test. For these reasons the adhesive shear test is preferred.
For the peel test (Fig. 2f), the test specimens cannot be taken from conventional production. A release film must be added during the production process so that the interlayer only adheres to one glass pane. Aluminum foil is laminated to the PVB film to prevent high elongation when peeling the PVB film. The PVB film should also protrude so that it can be clamped in the tensile testing machine. The protruding film is pulled off the glass pane at a defined angle with a constant force level. The applied force is a measure for adhesion (Kuraray 2012; Schneider et al. 2016). Disadvantages of the test method are the costly production of the test specimens and the influence of the elongation of the PVB film and the aluminum film. This test is used especially in the photovoltaic industry for EVA films (Kuraray 2012).
For the Through-Cracked-Tensile Test (TCT, Fig. 2g) and the Through-Cracked-Bending Test (TCB, Fig. 2h), the glass panes of the laminated glass sample are broken in a defined manner. The sample is then subjected to a tensile test or a four point bending test respectively. The TCT test determines not only the delamination behaviour between glass and interlayer but also the material behaviour of the interlayer itself. Additionally there is the possibility to determine parameters for cohesive zone models, such as the energy release rate (Franz 2015; Schneider et al. 2016).
The Pummel test (further description in Sect. 2) is the most common test method for estimating the adhesion between glass and interlayer in production facilities. After the sample has been brought to the desired temperature of − 18 °C for several hours, it is placed on an inclined hard metal base. Then a certain glass surface is pulverized by means of hammer blows (manual, semi-automatic e.g. by a hydraulic or electrical controlled hammer that always strikes the same spot so that the laminate has to be moved manually, or fully-automatic).
One side of the sample is Pummeled on the tin side (Sn) and one side of the sample on the air/fire side (A/F). The evaluation is done visually with the help of reference pictures or tables indicating percentages of free film surface, see Sects. 2.1 and 2.2. The adhesion scale, also known as Pummel values, ranges from 0 (low adhesion) to 10 (high adhesion). Compared to the other test methods presented above, the Pummel test has the advantage that it can be carried out without much effort. Furthermore, no complex and expensive testing machines or sample preparations are required. For a manual execution only a hammer and an angled metal support are necessary.
However, the lack of standards leads to enormous differences in implementation and evaluation. The test method depends strongly on the experience of the test person. In particular, the number and intensity of hammer blows can lead to different results, see Sect. 3. Furthermore, changes in the angle of inclination between specimen and metal surface may result in different fracture patterns (Hark 2012). The different Pummel values result additionally from the subjective evaluation, which is judged by the naked eye of the examiner. Standardization of the execution procedure and evaluation would finally allow an objective statement. For this purpose, Sect. 2 first presents the state of the art and research for realization and evaluation. Subsequently, conducted experiments are presented in Sect. 3 and automated evaluation methods are proposed and discussed in Sect. 4.
Pummel test
Although the Pummel test is widely used, there is no standardization for its implementation and evaluation. In literature, however, there are different patent specifications, manufacturer guidelines and isolated research papers, which are briefly presented here.
Patent specifications
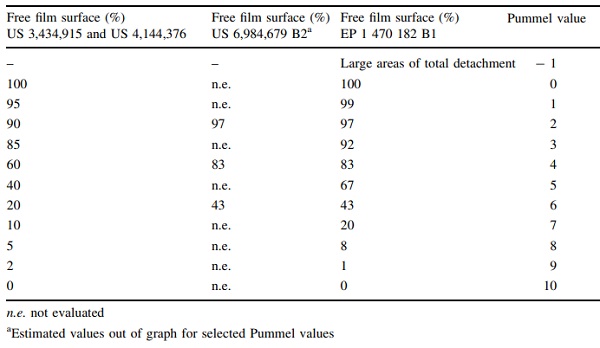
The Pummel test was mentioned for the first time in the United States Patent US 3,434,915, which was applied by Garrison (1965) in 1965 for laminated safety glass in car windscreens. According to this patent, the test specimens (no dimensions specified) are first stored for 16 ± 4 h at a temperature of approx. − 18 °C. The cooled specimen is held against an angled metal surface. The sample is inclined so that one side of the glass only touches the metal with the edge. Then a flat-headed hammer is used to pulverize the surface. The destroyed surface is at least 7.62 cm in diameter and the remaining glass particles should not be larger than 0.64 cm. Afterwards, the loose glass fragments are carefully removed by shaking gently and the degree of adhesion is determined using a table containing Pummel values for different free film surfaces, see Table 1.
Table 1 Pummel Values in dependency of free film surface - Full size table
In 1977 the United States Patent US 4,144,376 (Beckmann and Knackstedt 1977) was registered. Here, a procedure to regulate the adhesion of a plasticized, partially acetalized polyvinyl alcohol film for required Pummel adhesion values is described. PVB resin was processed with conventional methods in newly determined quantities for laminated safety glass. The samples for the Pummel test had the dimensions 150 × 300 mm and were cooled for 2–8 h at a temperature of − 18 °C (± 0.5 °C). The samples were then placed on a metal block angled at 45°. The glass surface was treated with a flat-headed hammer until the glass was completely pulverized. The test area was 100 × 150 mm. The Pummel test was performed and evaluated according to the US Patent 3,434,915.
The Pummel test is also described in the United States Patent US 6,984,679 B2 (Papenfuhs and Steuer 2006) and is used to check the level of adhesion. The test specimens are each stored with 2 × 2 mm float glass (100 × 300 mm) for 4 h at a temperature of − 18 °C. The laminate is placed on a 45° inclined support and destroyed with an automatic hammer. Figure 3a shows the impact pattern and Fig. 3b the graph, on which the evaluation of the Pummel test is based. If one compares the graph with Table 1, one sees differences in the Pummel value assignment. For example, in US 3,434,915, a Pummel value of 2 corresponds to a free film surface of 90%, a Pummel value of 4 corresponds to a free film surface of 60% and Pummel 6 corresponds to a free film surface of 20%, while in US 6,984,679 B2 Pummel 2 corresponds to a free foil area of ~ 97% Pummel 4 corresponds to a free foil area of ~ 83% and Pummel 6 corresponds to a free foil area of ~ 43%.
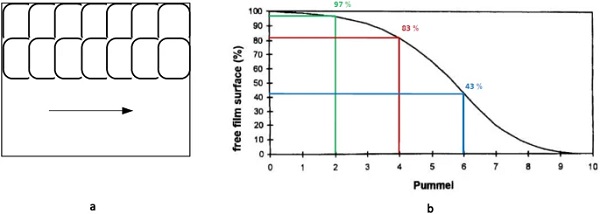
The European Patent EP 1 470 182 B1 (Keller et al. 2002) treats a plasticized film of partially acetalized polyvinyl alcohols as an interlayer for laminated safety glass. Among other things, these laminates are subjected to the Pummel test described in the patent. The test specimens (80 × 300 mm) consist of two 2.1 mm thick float glass panes and are stored for at least 24 h in a cold chamber at a temperature of − 18 °C (± 2 °C). The specimens are then placed on a steel base at an inclination of 5° and Pummeled evenly with a hammer head (500 g, round head).
The impact intensity is 1 Nm per impact. To ensure that the glass plate is completely destroyed at every point all the blows overlap by 75%. At least 6 cm (from the lower edge measured) is destroyed. After the sample is lightly tapped, a visual inspection is carried out at room temperature. The Pummel values (0–10) are assigned via the exposed foil areas. If a test specimen shows large areas of total detachment, Pummel value − 1 can be assigned to it. The classification of the Pummel values as a function of the free film surface corresponds to the graph from US 6,984,679 B2.
Manufacturer guidelines
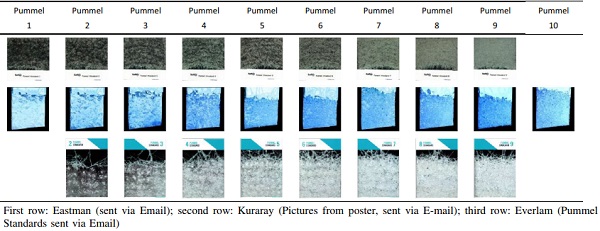
Eastman provides a description of the Pummel test and its evaluation. Eastman has sent reference pictures and a description of the experiment to the authors. Reference pictures of the Pummel classes 1–9 are given in Table 2. The description of the experiment can also be found in (Eastman 2013). It is recommended to put the laminated samples (no dimension given) in an − 18 °C freezer for enough time (1–6 h depending on freezer) in order that they may reach temperature equilibrium. After the samples are conditioned, the Pummeling procedure should start within seconds of removal from the freezer. It is recommended, that the sample is held at about a 5° angle to the plane of the Pummel plate, so that only the edge of the unbroken glass contacts the plate.
The laminate should be struck progressively in about 10 mm increments along the bottom 15 mm of the laminate. When the bottom edge has been completely pulverized, the next 15 mm has to be pulverized in the same manner. This has to be repeated until at least 7–10 cm of the laminate has been Pummeled. Care is exercised to insure that all smooth glass is pulverized. Loose glass dust has to be removed by slightly brushing the Pummeled laminate. For the evaluation and Pummel classification it is advised to place the laminate on a black background and to compare the sample to the Pummel adhesion references.
Everlam has also provided the authors with a brochure containing a description of the Pummel procedure as well as the evaluation for EVERLAM™-PVB laminates. Here the test specimens (no dimensions) have to be cooled down to a temperature of − 18 °C for 3 h. The sample is then Pummeled manually with a flat-head hammer with a weight of 500 g on an anvil at 5°. The blows are made with a distance of 1.25 cm in a row and with 2 cm distance between the rows. The destroyed laminate is visually inspected with the reference pictures (Table 2). Furthermore, an evaluation diagram based on the values of the US 4,144,376 and correlation diagrams of Pummel values with CSS and ball drop performances are included.
Table 2 Reference pictures from different PVB manufacturers - Full size table
In Kuraray’s manual dealing with the processing of Trosifol® PVB, the experimental execution is briefly described (Kuraray 2012). The sample dimensions are 80 × 200 mm (resp. 80 × 300 mm for windscreen samples) and the float glass thickness should not exceed 4 mm. The sample is stored for at least 2 h at a temperature of − 18 °C. The Pummeling process is semi-automatic. The glass forms a small angle to the inclined metal base. According to the manual, a rough distinction is made between high and medium glass adhesion according to the classification in a diagram.
In addition to the manual, Kuraray also sent us a poster with reference pictures of Pummel values from 1 to 10 for Trosifol® interlayers. Those are represented in Table 2. Additionally, a Pummel manual can be found on the manufacturers website (Kuraray 2014). Regarding laminates with PVB, the Pummel standards (Pummeling procedure, reference pictures, graph with free film surface, correlations to CSS and ball drop tests) correspond to those of Everlam. It should be noted, that the reference pictures differ from the poster and the Pummel standard manual.
There is also a working instruction for the Pummel test on laminated safety glass with ionoplast (SentryGlas®). However, since this interlayer material is not part of the investigations presented, it will not be discussed in detail here. Further information can be found in (Stüwe 2007).
Looking at the classification based on the reference images of different manufacturers (Table 2), one can see that already the adhesion scale differs among the film manufacturers. Kuraray compares the samples with Pummel values from 1 to 10, Eastman with the values from 1 to 9 and Everlam only with the Pummel values from 2 to 9. Reasons for further differences are different lighting conditions and the different recording angle of the samples.
Research
Pummel tests were carried out in several research projects on the subject of adhesion and correlations with other adhesion tests were investigated.
Keller and Mortelmans (1999) investigated the adhesion mechanism between glass and interlayer. Two test methods were used to determine the adhesion, the Pummel test and the compression shear test. In the Pummel test, the laminated glass sample (no dimensions given) was cooled to − 18 °C and Pummelled with a hammer weighing approx. 453 g on a steel plate until both sides of the sample were pulverized. The destroyed sample was then visually evaluated according to the Pummel scale 0–10. By comparing the results of the two test methods, it can be seen that these usually correlate almost linearly, if the condition is fulfilled that the test specimens are derived from the same batch.
Franz (2015) evaluated in his dissertation the state of knowledge on fractured laminated safety glass and the further development of the residual strength tests. Two test methods were used to assess the adhesive strength and quality. On the one hand, the Pummel test to check the adhesive quality, on the other hand the adhesive shear test to verify the adhesive strength. The description of the execution of the adhesive shear test is omitted here. The Pummel samples consisted of 2 × 3 mm float glass and 1.52 mm PVB foil. The foil had three different degrees of adhesion (BG R10, BG R15 and BG R20, Trosifol (R) interlayers).
The dimensions were 80 × 300 mm. The laminates were stored at − 18 °C for 2 h. Then the tin and fire sides were Pummelled with a hammer to determine the adhesion of both glass sides. For evaluation the destroyed samples were visually compared with reference pictures and classified on a Pummel scale from 0 to 10. Franz (2015) compared the Pummeling results with the shear strengths resulting from the shear test. He showed that the adhesive stresses increase with increasing Pummel value.
Hof and Oechsner (2017) investigated the adhesion of laminated glass as a function of moisture content within the film with three different test methods. With the help of a spectrophotometer they were able to determine the light transmittance at a specific wavelength (which is dependent on the interlayer moisture level) of several glass panes. Furthermore, the VW Pull Test and the Pummel test were applied. The samples had the dimensions 100 × 200 mm and a total thickness of about 8.5 mm. Both sides of the sample were destroyed with a hammer. The results showed that samples with a moisture content below 0.67% led to a high Pummel value (Pummel 7–8) and samples with a moisture content above 0.67% led to low Pummel values (Pummel < 3).
In his bachelor’s thesis, Hark (2012) was mainly concerned with the evaluation of the Pummel test. For this purpose he examined different procedures, such as weight change, change in the light transmission of the laminated safety glass, profile analysis of the test specimen, maximum stress and maximum elongation of Pummelled specimens. The test specimens had a dimension of 25 × 7.5 cm. They consisted of two float glass panes of 2.95 mm each and a 0.76 mm PVB film. Three different adhesion levels were investigated.
The samples were stored at temperatures of − 24 °C, − 18 °C and above − 18 °C (no details given) for about 2 h. The Pummel test was performed on a sloping metal surface. This prevented the glass fragments from remaining on the sample. The sample was also slightly tilted away from the metal surface to achieve a better impact effect. The evaluation showed that at temperatures higher than − 18 °C, the interlayer became too elastic, so that the fragments were pressed into the foil by the hammer blows and did not detach from the foil.
Experimental investigation
In this section, the human influence during the pummeling process is examined. Three different test persons were used and the results were compared to those of the experiments with a Pummel apparatus.
Samples and performed tests
The composition of the LSG samples was 3 mm Float Glass / 0.76 mm PVB / 3 mm Float Glass. 300 × 300 mm large laminates were created, which were then cut to 100 × 300 mm large samples by the manufacturer. According to the manufacturer, the samples should have a Pummel value of 7.
All samples were provided with an impact pattern consisting of 56 impact fields (7 rows of 8 impact fields, see Fig. 4b) before storage. In addition, the tin and air side was detected with a UV lamp and marked. After noting the glass thickness, the laminate thickness and the mass, the samples were stored in a climate chamber at a constant temperature of − 18 °C and a relative humidity of 25–30%rH for ~ 24 h. The tests were carried out at room temperature. First the tin side was tested. The glass sample was then lightly tapped. The visual evaluation was performed each time directly on site using Kuraray’s reference images. In addition, the final weight was weighed and a picture was taken for later evaluation. A camera system is required to ensure identical recording conditions for the sample pictures after the test has been carried out.
This consists of a box (Fig. 4a) made of cardboard with black interior walls, and two opposite open sides. On one open side a light source is positioned at a defined distance. The selected setting is retained for all pictures. Like the box, the light construction is made of cardboard, to which three LED strips have been attached. The sample can be placed in the box through the other open side. The Pummelled sample is placed in the same position after each test. A hole has been cut in the upper side of the box to allow the camera to be placed on the box and take pictures from the same position. Before the air side was tested, the sample was placed back in the climate chamber for another 15 min. Again, this side was also visually evaluated, weighed and photographed in the camera device. An infrared thermometer was used to record the temperature of the glass surface before and after the experiment.

The human influence was investigated by having three different people carry out the experiment. Further test series were carried out with the Pummel apparatus shown in Fig. 5, so that comparisons could be made between the manual and semi-automatic Pummel test. The same hammer was used for all tests. In preliminary tests, a fitter’s hammer with a hammer head weight of 800 g was selected. In all manual tests and part of the tests with the Pummel apparatus the applied force was measured. For this purpose the hammer was equipped with a ring load cell (Fig. 4c).
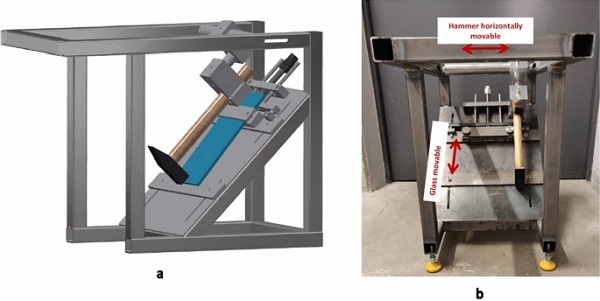
The Pummel apparatus consists of a steel frame. A metal plate is welded to the steel frame at an angle of 45°, on which the glass plate can be fixed, so that it is at a flat angle of about 5° to the inclined metal plate. The upper part of the sample is clamped, while the lower part leans on the inclined plate. A threaded rod on the clamp makes it possible to move the sample along the inclined plate. The hammer strikes the sample from above. It is adjusted so that it hits the glass plate at a right angle. The maximum drop height corresponds to the vertical alignment of the hammer handle (75 cm between centre axis of the hammer head and impact surface on the glass plate). Furthermore, the position of the hammer can be moved horizontally along the axis. The hammer mounting is designed so that different hammers can be used.
Test results
Figure 6 (rows 2–4) shows the applied forces during the manual Pummel procedure of three different test persons using the example of one sample at a time. A peak grouping corresponds to the Pummeling of one row. The sections in between show the time it took to move the sample down.
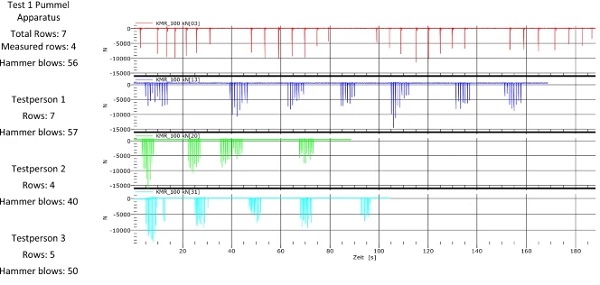
As can be seen from the force–time curves and from Table 3, the three test persons performed the Pummel test differently. The required rows vary between 3 and 7, the required strokes between 26 and 57. Also the amount of the forces differs from person to person, especially when looking at the variations between the rows. This leads to different visual impressions of the texture, see Fig. 7.
Table 3 Comparison of different tests - Full size table

Figure 6 (row 1) shows the applied forces during the semi-automatic Pummel procedure with the Pummel apparatus. Here, the number of rows was fixed to 7 and the number of hammer blows to 56 (8 per row). Compared to Fig. 6 (rows 2–4) we can see that the Pummeling process, as expected, was performed more evenly regarding the variances between the individual rows. It can also be seen that the forces at the beginning and end of a row are lower than in the middle of the row, although the hammer hits the sample from the same height of fall. This is probably unavoidable due to the overlapping blows and the associated changing nature of the impact surface.
To finally evaluate the results, assign pummel values and investigate whether the manually induced variations during the pummeling effect the pummel result, a suitable automated evaluation method and a uniform Pummel scaling rate must first be established.
For this purpose, Sect. 4 will first present general methods of digital image evaluation for pummel rating and apply them to the Eastman reference pictures. Furthermore, approaches to reduce external influences such as different exposure situations and image resolutions are presented in Sect. 5.
Evaluation methods
General
In order to eliminate the human influence on the evaluation of the test samples, automated image analysis methods have been created in MATLAB. Three different evaluation types were examined:
- Method A Analysis of the free film surface using Binary Images,
- Method B First order statistical evaluation of the greyscale images and
- Method C Texture analysis using co-occurrence matrices and second order statistics
First a short insight into image parameters and digital image processing is given.
A digital image consists of different picture elements, called pixels, and is represented via a two-dimensional matrix. The dimensions of this matrix correspond to the image size. Each element of the matrix is occupied with a finite, discrete quantile of numeric representation for its intensity in a certain colour map.
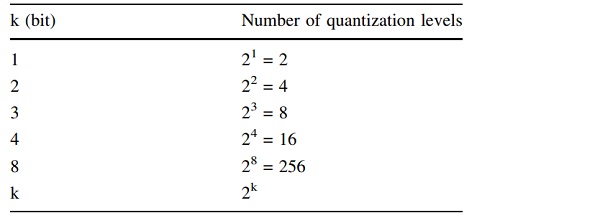
Binary Images only consist of two quantization levels 0 and 1, which usually represent black and white. Greyscale Images are single-channel images and are displayed with positive integer numbers. The value range is determined by the bit-number (colour depth) of the image. A typical greyscale image uses k = 8 bits, which means that a pixel in the image can take 2k= 28 = 256 different intensity values (Table 4). The lowest intensity level corresponds to black (0) and the highest level to white (255). Colour images are multi-channel images. Usually they are created in the primary colours red, green, blue (RGB model). Each of these colour components consists of usually 8 bits. Similar to the 8bit greyscale images, the value range of the components lies between [0,…, 255]. Through additive colour mixing of the primary colours, a variety of colours and tones can be displayed. Besides the RGB model there are also other colour maps, such as CMYK colour model (Cyan-Magenta-Yellow-Black).
Table 4 Number of quantization levels - Full size table
RGB images are converted to greyscale images by eliminating the colour tone and saturation information while retaining the luminance. The luminance is calculated with a weighted sum of the three basic colours: 0.299 × Red + 0.587 × Green + 0.114 × Blue. A threshold value is required to convert a greyscale image into a binary image. This defines up to which grey value a pixel is still considered black or from which grey value a pixel is still considered white. The threshold value can be set either manually or automatically.
The easiest and most intuitive image features for image analysis are computed from histograms of the greyscales in the image, which describes the statistical occurrence of the different greyscales. For this purpose, the number of pixels with the same grey value is counted and stored in a vector. Often this vector is displayed as a bar chart whose X-axis indicates the intensity and whose Y-axis represents the number of pixels with exactly this intensity. From the intensity diagram of an image, first order statistics can be computed.
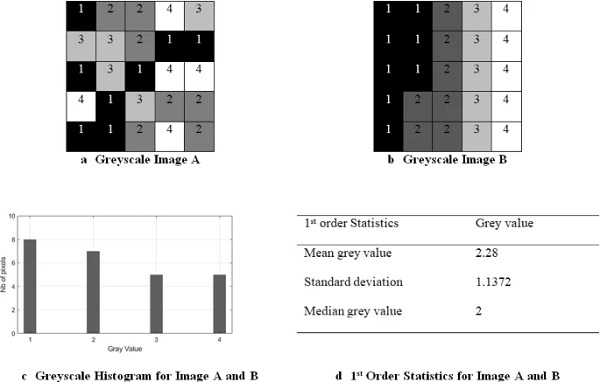
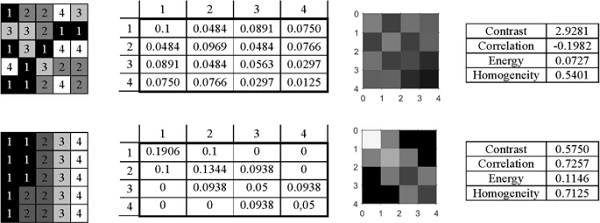
This includes, for example, the calculation of the mean grey value, the median grey value, value of average contrast expressed with the standard deviation, variance of grey values, skewness of the histogram, etc. These features are based on the values of individual pixels, but neglect the relative position of pixels with respect to each other and hence neglect what is called the image texture in this paper (Lofstedt et al. 2019). Figure 8 shows two images A and B with the same number of quantization levels (1 = black, 4 = white). Although our eye obviously perceives two different images, both images result in the same histogram.
To analyze the image texture, higher-order statistics are required. These consider the interaction between two or more pixels at a time. Methods that make this possible are, for example, the Local Binary Pattern method, the use of Gabor filters or the creation and evaluation of Grey-Level-Co-Occurrence-Matrices (GLCM). GLCM have successfully been applied in medical analysis, e.g. X-ray mammography, brain cancer, in fabric defect detection, in image classification of satellite images, in face recognition and many others, which is why this method is investigated further in this paper (Chan et al. 1995; Eleyan and Demirel 2011; Elshinawy et al. 2011; Gomez et al. 2012; Haralick et al. 1973; Lofstedt et al. 2019; Raheja et al. 2013; Ulaby et al. 1986; Zayed and Elnemr 2015).
The GLCM is a square matrix which size N × N is specified by the number of grey-levels N in the quantized image. The matrix elements GLCM[i,j] indicate how often a pixel with the grey value i ∈ [0:N] and a pixel with the grey value j ∈ [0:N] occur in a spatial relationship in the image. The spatial relationship, also called offset, defines the direction and distance between the pixel of interest and its neighbour. For the right immediate neighbour, the direction corresponds to 0 and the distance to 1 which corresponds to a offset vector of (0,1). It is also possible to investigate more distant neighbours. The consideration of a single direction leads to a GLCM sensitive to rotation.
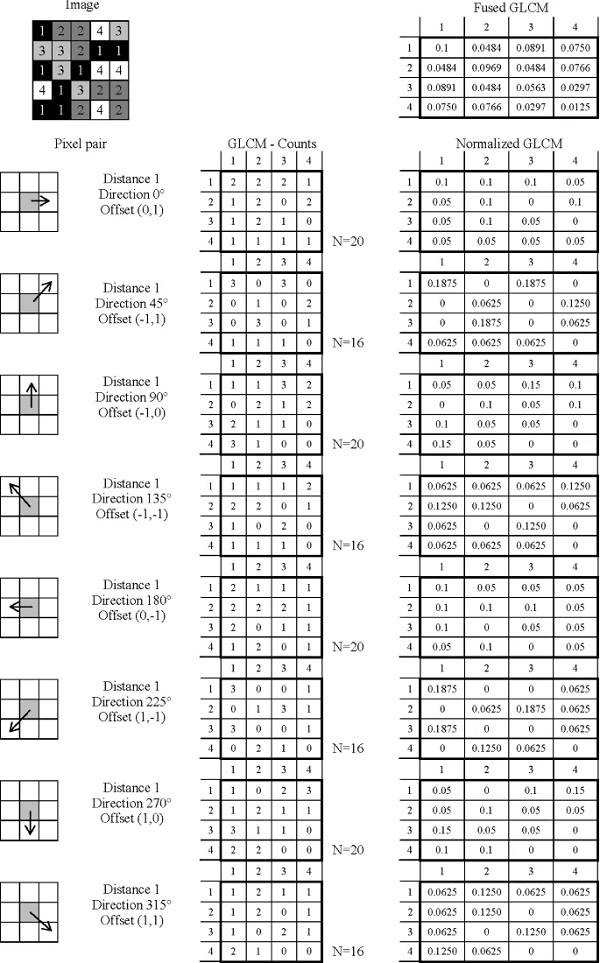
For eight immediate neighbours (distance = 1) of a pixel, eight offset vectors and eight corresponding GLCMs may be created, and fused see Fig. 9. Considering offset vectors with opposite directions equals to an evaluation of pixel relations in e.g. horizontal or vertical direction instead of right or left resp. up or down and lead to symmetrical GLCMs. In order to combine different offsets, the GLCMs are normalized by dividing each matrix element with the sum of all elements. The normalized elements can be considered as the joint probability occurrence p(i,j) of the considered pixel pair with the greyscales i and j. The final, fused, GLCM is obtained by generating the mean values of the joint occurrence probabilities of the considered offsets. This final matrix can be described with the Haralick parameters (Lofstedt et al. 2019; Talibi Alaoui and Sbihi 2013).
The main Haralick features are (Haralick et al. 1973; Zayed and Elnemr 2015):
Contrast
The contrast, also known as variance or inertia, is a measure of intensity variations between a pixel and its neighbour over the whole image. The higher the contrast, the more the entries of the normalized GLCM move away from the matrix diagonal. The minimum value is 0, which is obtained for a constant image.

Correlation
The correlation is a measure of how correlated a pixel is to its neighbour over the whole image. The range is [− 1:1], where 1 equals a perfectly positively correlation and − 1 equals a perfectly negative correlation. For a constant image no correlation can be computed.

μx = mean value of the partial probability function in x-direction (column); σxσx = standard deviation of the partial probability function in x-direction (column);

and σy are calculated analogously by substituting j for i. For symmetric GLCMs: μi = μj and σi = σj.
Energy
The energy, also known as uniformity or angular second moment, equals the sum of the squared elements in the normalized GLCM. It is a measure of texture roughness. When pixels have similar intensity, the energy is high. The range is [0:1]. The energy of a constant image equals 1.

Homogeneity
The homogeneity is a measure of how close the elements of the normalized GLCM are to its diagonal. Typically, homogeneity increases with decreasing contrast. Homogeneity has a range of [0:1]. For a diagonal GLCM, the homogeneity equals 1.

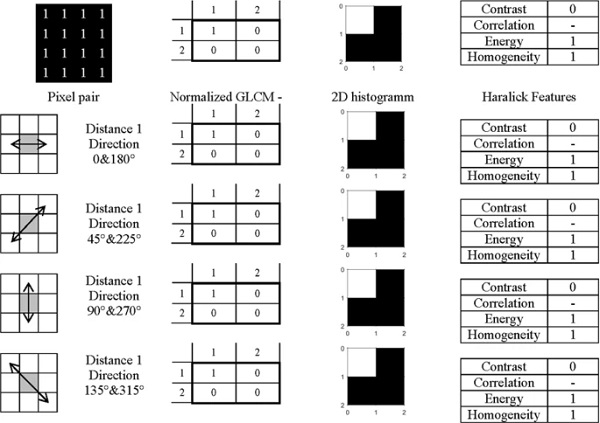
In order to clarify the significance of the individual features, simple artificially created greyscale images will be examined as examples (Figs. 10, 11, 12). In these pictures the opposite directions are already combined, so that only 4 single GLCM are shown. GLCMs can also be displayed as a 2-dimensional histogram by showing the matrix elements in the grey value corresponding to the matrix entry. Light grey values represent a high probability of occurrence (upper limit: white, 1), dark ones a lower probability (lower limit: black, 0).
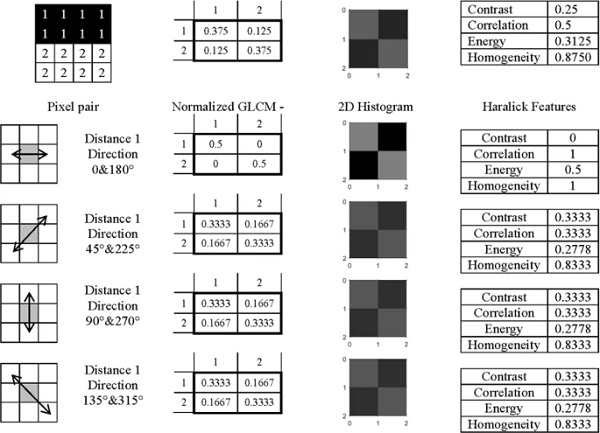
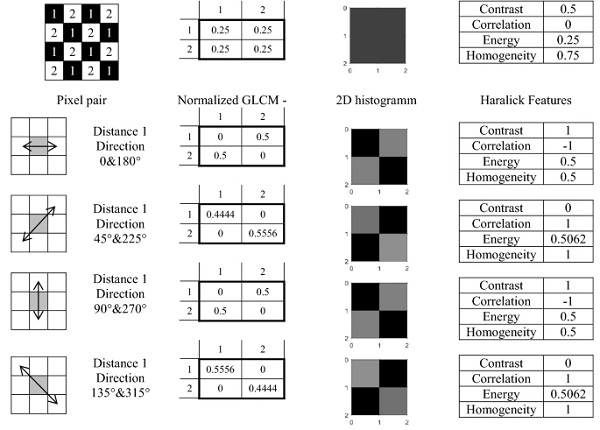
If one compares the three simple examples with pictures consisting exclusively of 2 grey values, the Haralick features can be explained very clearly.
In the case of the constant image (Fig. 10), both the fused GLCM and the four individual normalized GLCMs are identical. This is because the image is independent of rotation. Only the element GLCM(1,1) is occupied. The value is 1, which means that the probability that the neighbour has the same grey value as the pixel under consideration is 100%.
The second image (Fig. 11) consists of two halves, with the upper half consisting of black pixels and the lower half of white pixels. If only the horizontal neighbours are considered, a GLCM is created where only the diagonal is occupied. The probability that 2 black pixels are adjacent is just as high as the probability that 2 white neighbours are horizontally adjacent (0.5 and 0.5). The probability that a black pixel is horizontally adjacent to a white pixel (and vice versa) is 0. The 2D histogram therefore appears on the diagonal in a medium grey tone, while the remaining elements are displayed in black. The contrast in the horizontal direction is therefore 0 (non-existent), the homogeneity 1 (fully developed). Horizontally adjacent pixels corrode to 100% and the energy is in the middle range. Looking at the remaining three directions, the GLCMs are identical. This means, for example, that it is equally likely that the pixel pair (1,1) will occur in diagonal or vertical direction, namely 33.333%.
The repetitive pattern in Fig. 12 best illustrates the Haralick features. In both the horizontal and vertical directions, the probability that the neighbouring pixel will differ in colour from the pixel under consideration is 100%. Thus the diagonals of the GLSM are empty and the remaining elements are each assigned the value 0.5. The contrast is fully pronounced. Two horizontally or vertically adjacent pixels force the correlation − 1. The energy and the homogeneity are in the middle range. In the diagonal direction (left or right) there are always pixels with the same colour, which means that diagonal neighbouring pixels have a perfect correlation. Only the diagonals of the GLCMs are occupied here. The contrast is 0 in this case, while the homogeneity is fully developed with the value 1. The combined GLCM only has matrix entries of the same size, so the 2D histogram is constant. This means that it is equally likely that one of the eight pixel neighbours has the same or a different pixel colour.
If one now compares the fused GLCMs of the three examples, the contrast increases, homogeneity, correlation and energy decrease.
The GLCMs and Haralick parameters of the images shown in Fig. 13 show clear differences. At this point it should be remembered that these images were not distinguishable when looking at the 1st order statistics (see Fig. 8). In the upper image, the contrast between directly adjacent pixels is significantly higher, while the homogeneity and energy are lower than in the lower image. In the upper image the correlation even takes on a negative value. This example shows the high potential of this texture recognition tool. In relation to the evaluation of Pummel images, the texture of the pulverized glass is also evaluated (coarse for low Pummel values, fine for high Pummel values). This makes the evaluation more independent of the lighting conditions.
In the following sections the three evaluation methods A (Analysis of Binary Images), B (First Order Statistical Evaluation of the Greyscale Images) and C (Texture Analysis using Co-Occurrence Matrices and Second Order Statistics) will be tested on the Eastman reference Pummel pictures. The procedure is first briefly explained using two different Pummel pictures (Pummel 1 and Pummel 7). In addition, the results of the three methods are shown for all 9 reference pictures. The aim is to find an evaluation methodology that finds clear differences in the nine reference pictures and thus allows a later automated assignment into a Pummel class.
Method A: analysis of binary images
The first idea for automated evaluation is based on the evaluation method described in the patents (see Sect. 2.1). As already described above, the assignment of a Pummel value is usually done via the percentage of free film area.
Accordingly, both the image of the Pummelled sample and the reference images should first be converted into a binary black and white image and then the number of black (free foil) and white (glass) pixels should be determined. By comparing the sample with the reference images (e.g. by calculating a correlation factor), a Pummel value is finally assigned.
However, the determination of a threshold value for conversion into a binary image has proven to be problematic. In order to keep the human influence as low as possible, it was decided to use the Otsu algorithm (Otsu 1979; Gonzalez et al. 2009) to determine the threshold value. The pixels of the greyscale image are divided into two groups in such a way that the variance within the group is as small as possible and at the same time the variance between the groups is as high as possible. Otsu’s method exhibits the relatively good performance if the histogram can be assumed to have bimodal distribution and assumed to possess a deep and sharp valley between two peaks.
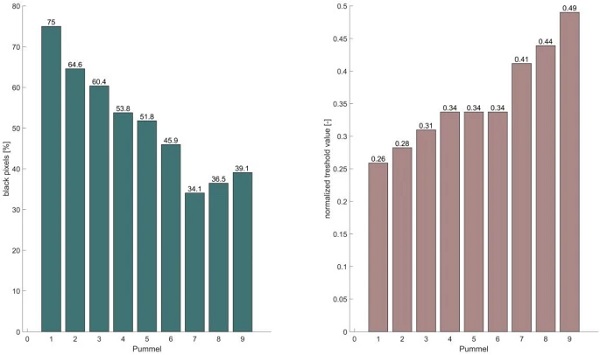
If one looks at the greyscale histogram of the two reference Pummel images (Pummel 1 and 7, Fig. 14), it becomes clear that there is no bimodality, which can lead to errors in the automated threshold determination. If one looks at the automatically determined thresholds of all nine reference pictures, three different areas can be identified: the first area comprises Pummel 1–3 and has comparatively low thresholds. For Pummel pictures 4–6 (area 2), identical, medium–high threshold values were determined. The third area comprises Pummel 7–9 with comparatively high threshold values.
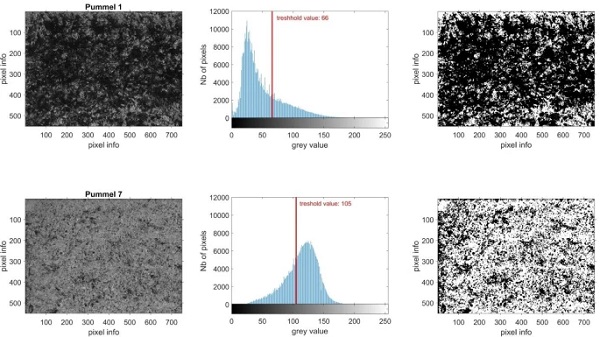
If the reference images are now converted into binary images with the individual threshold values and the proportions of black pixels are then determined (Table 5, resp. Fig. 15), the desired result is not obtained. For Pummel values greater than 7, the share of black pixels increases again, which excludes a Pummel class assignment based on this criterion. Classification using the threshold value seems to make more sense here.
Table 5 Black/White pixels and threshold value according to Otsu Algorithm for the 9 reference pictures - Full size table
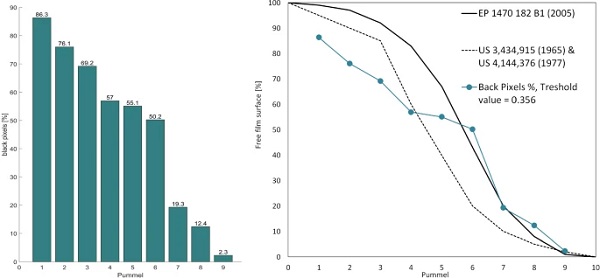
If a constant threshold value is used for all nine reference images (in this case the mean value of the individual threshold values determined according to Otsu was used, see Table 6a,) a different result is obtained. Here the percentage of black always decreases as the Pummel value increases. However, it is also apparent here that the black components of the mean Pummel values are very close together, and an allocation in this range can be difficult. If one compares the result with the values given in the patents, Fig. 16 is obtained.
Table 6 Black/White pixels with a constant threshold value of 0.356 (mean of threshold values of Table 5) - Full size table
Method B: first order statistical evaluation of the greyscale images
In order to avoid the problem of finding a suitable threshold value (see Method A), method B evaluates the grey value images with 1st order statistics. For this purpose, the histograms of the grey-value reference images are examined. This is exemplarily shown in Fig. 17 for Pummel 1 and Pummel 7.
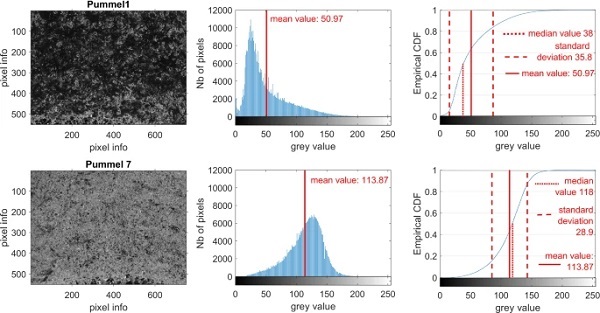
The average value is a measure of the brightness of the image, wherein a high mean value corresponds to an overall brighter and a low mean value to an overall darker image impression. The standard deviation and the square deviation (also called variance) are parameters that characterize the grey value distribution. The variance is a measure of the scattering of the grey values around the mean value and therefore provides information about the global contrast (high variance) and homogeneity (low variance).
Another important characteristic of the grey value distribution is the median. This is the grey value at which 50% of all pixels in the image have a higher grey value and 50% of all pixels in the image have a lower grey value. If the median and the mean value are identical, the grey value distribution is symmetrical; if they differ, the grey value distribution is asymmetrical.
The assignment criteria that are examined here with this method are: mean value, median and cumulative distribution function. The cumulative distribution functions of all 9 Pummel reference pictures are shown in Fig. 18. Here it is particularly noticeable that the distribution functions of the middle Pummel values intersect (Pummel 4–Pummel 6). Mean values, median values, standard deviations and variances are summarized in Table 7. Figure 19 shows the mean grey values and median values. The standard deviations are also shown in form of error bars around the mean values.
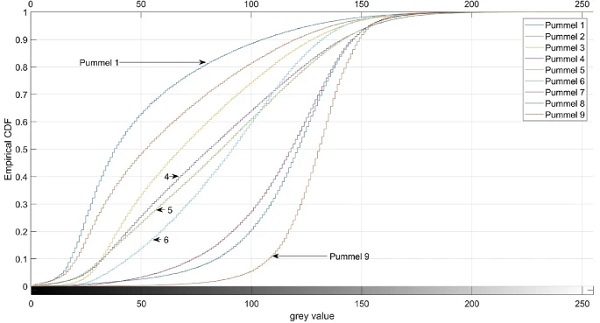
Table 7 Median and mean values, standard deviations and variances for all 9 Pummel references - Full size table
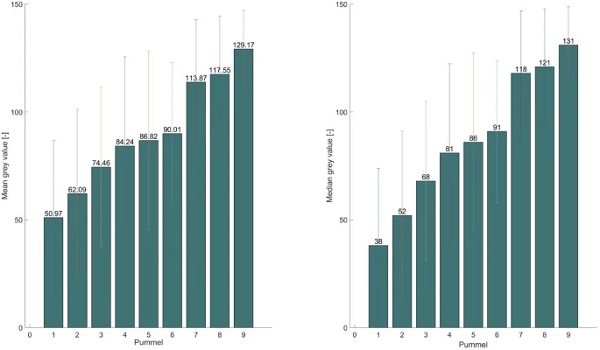
Overall it can be stated that the mean and median grey value increases with increasing Pummel value.
Method C: texture analysis using co-occurrence matrices and second order statistics
The previously presented methods A and B are not to be rejected in principle. However, in Sect. 4.1 a decisive disadvantage of these two evaluation methods could be shown: different image patterns can have the same histograms and thus cannot be differentiated from each other with 1st order statistics. In addition, methods A and B have the disadvantage that they are very dependent on the lighting conditions under which the images were taken.
To minimize the influence of different illuminations, the grey tone histograms of the images can be equalized before texture analysis. Histogram equalization is a method that stretches the intensity range of the histogram to the entire intensity range and hence improves the contrast. The equalized histograms have 64 bins and are flat compared to the original histograms. This is illustrated in Fig. 20. Figure 20a shows the original greyscale image of the reference picture Pummel 7, the greyscale image with subsequently reduced brightness and the greyscale image with subsequently increased brightness.
In addition, the respective grey value histograms are shown. It is obvious that the evaluation methods according to 1st order statistics (derived from grey value histogram) are directly influenced by this. The original image, for example, has a mean grey value of 113.87 (see Table 7), the darkened image of 71.20 and the illuminated image of 160.76. Figure 20b shows the corresponding images after histogram equalization.
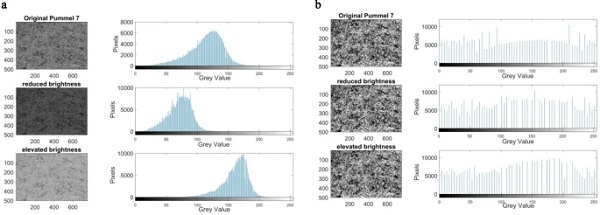
Figure 21 shows the combined GLCM (all eight neighbours were considered) exemplary for Pummel 1 and 7. Since 64 grey values are represented in an equalized pummel image, the GLCMs are not displayed in matrix form here, but only the 2D histograms are shown.
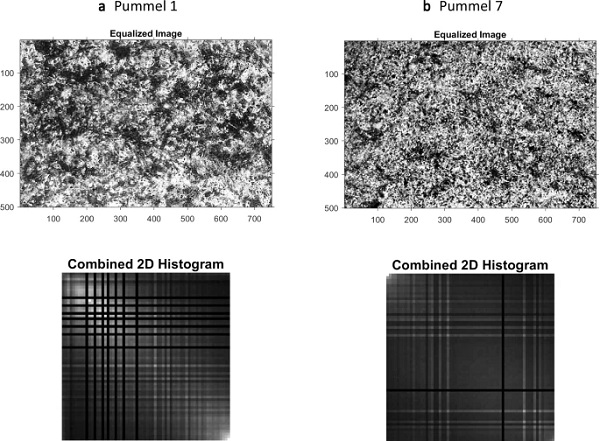
The distance factor between neighbours was set to 4. The value 4 resulted from a preliminary study, where the correlation feature at variant distances was evaluated. When observing the direct neighbour (distance = 1) there were hardly any differences in the correlation factor of the nine reference images. The reason why the directly adjacent pixels always correlate well is that the texture differences only occur with a larger pixel pitch. Only at a distance of 4 or more, differences became noticeable. Accordingly, the distance is dependent on the image resolution, which has to be further investigated.
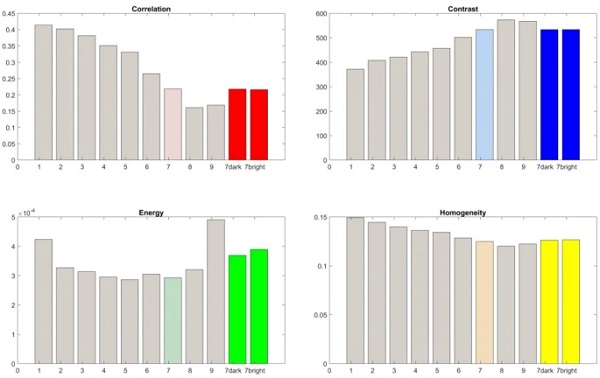
Figure 22 shows the four main Haralick features for all 9 equalized reference images. Except for the energy, all features have a more or less monotonous course, so that the Pummel scale can be characterized by a vector containing the three features Correlation, Contrast and Homogeneity. Furthermore, Fig. 22 illustrates, that identical results are obtained for those three parameters, when using the equalized images of different illuminations. Therefore, this method seems to be effective in terms of eliminating different illumination conditions.
Evaluation of the test samples
Especially when analyzing structures e.g. with Method C, the image scale (how large is the imaged object in cm and with how many pixels is it displayed) plays a decisive role. If one looks at the individual Pummel reference images (Table 2), it is important to note that the texture becomes finer as the pummel value increases. As a result, an image of a lower pummel value can be considered a zoom of the image of a higher pummel, which can lead to misinterpretations when the image scale isn’t specified.
According to the manufacturer, the samples shown in the reference images have the dimensions 15 × 15 cm, which corresponds to an image scale of 56 pixel/cm. For this reason the scale of the own pictures was adjusted. 336 × 224 pixel image sections were then analyzed with Methods A, B and C. This corresponds to evaluation areas of 6 × 4 cm. The corresponding evaluation images are shown in Fig. 23. To minimize differences in illumination, the equalized images were used for Method C, see Fig. 23, third row.
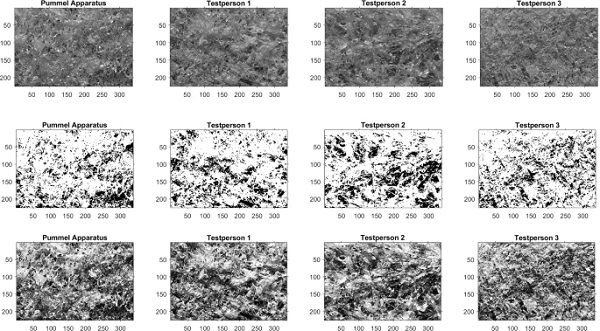
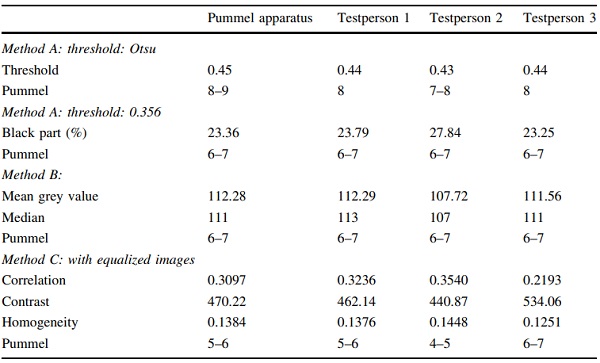
Table 8 summarizes the results of all three evaluation methods for the samples shown in Fig. 7.
Table 8 Results according to evaluation methods A, B and C for the samples shown in Fig. 7 - Full size table
It has already been shown that the evaluation methods according to 1st order statistics (Method A and B) depend very much on the illumination conditions of the image. Since it cannot be guaranteed that these are the same for the pummelled sample and the reference images, the comparison of the results of the self-pummelled samples with the pummel scales according to Tables 5, 6 and 7 must be viewed very critically. Nevertheless, 1st order statistics can be used to qualitatively compare the images in Fig. 7, as they were taken under the same lighting conditions.
Method A: analysis of binary images
The threshold values determined by Otsu’s algorithm are varying between 0.43 (Testperson 2) and 0.45 (Pummel Apparatus). If the evaluation scale according to Table 5 is used, the sample pummeled with the Pummel Apparatus would be assigned to Pummel 8–9; those pummeled by Testperson 1 and 3 to Pummel 8 and the sample pummeled by Testperson 2 to a pummel 7–8.
If the threshold value is constantly set to 0.356, all binary images consist of 23–28% black pixels. The lowest black ratio, which corresponds to the free film surface, occurs in the sample pummeled by Testperson 3 and the highest black ratio occurs in the sample pummeled by Testperson 2. According to Table 6 this corresponds to a Pummel value of 6–7 for all samples.
Method B: first order statistical evaluation of greyscale images
The median and mean grey values of all four samples are close together (between 107 and 113). The lowest median and mean grey values occur in the sample pummeled by Testperson 2, the highest in the sample pummeled by Testperson 1. According to Table 7, all samples would be assigned to Pummel 6–7.
Method C: texture analysis using co-occurrence matrices and second order statistics
The results for the correlation, contrast and homogeneity factors of the test evaluation Method C, deliver Pummel 5–6 for the samples pummeled by the Pummel Apparatus and Testperson 1. For the sample pummeled by Testperson 2, Pummel 4–5 and for the sample pummeled by Testperson 3, Pummel 6–7 is achieved.
It should be pointed out once again that until now, only one set of reference pictures has been taken into account. In order to get a uniform pummel scale, other reference images should be included in the study.
Nevertheless, it can be concluded that the self-pummelled pictures hardly differ according to 1st order statistics. However, if the texture is analysed, one can see that the sample of Testperson 3 is the finest and that of Testperson 2 the coarsest.
Summary and outlook
In this paper, the Pummel test was examined as an adhesion test. For this purpose, a research on the state of the art of performance and evaluation was presented first. Since neither the execution nor the evaluation are standardized, the test results are very objective.
The first part of the paper deals with the execution of experiments. Since manual tests with a hammer as well as semi-automatic or even fully automatic Pummel machines are used in industry to perform the Pummel test, this paper presented a test series in which the Pummel procedure of three different test persons as well as of a Pummel apparatus was investigated. The hammer was equipped with a load cell. The force–time curves show that both the number of blows and the forces vary greatly from person to person. In contrast, more reproducible force–time curves could be achieved with the Pummeling apparatus. This also became apparent during the visual inspection of the sample structure. For the final evaluation of these experiments, however, an objective evaluation method must first be found.
Therefore typical image evaluation methods were presented in the second part of this paper. Method A and B are very easy to implement. They can be derived from the grey tone histogram. However, it could be shown that different images may have identical histograms and therefore cannot be differentiated with these two methods. Furthermore, two images of the same sample under different lighting conditions can lead to different results.
To avoid these problems, a texture analysis based on the grey value Co-occurrence matrix can be carried out. It was shown that the use of equalized grey value images reduces the effect of different illuminations. The GLCM contains information about the spatial arrangement of neighbouring pixel intensities. Certain parameters (Haralick features) can be derived from the GLCM. In this paper the features contrast, correlation, energy and homogeneity were investigated. Using a simple example, it could be shown that the images that could not be distinguished according to statistical 1st order could now be differentiated. Hence, in theory the texture analysis based on GLCM is the most promising for becoming standardized. However, it is essential to define an image scale in order to get a uniformed reference pummel scale and a reliable assignment of the tests.
Until now, the three evaluation methods were tested with only one set of reference images. To be able to make a general statement, further studies are still required, especially for texture analysis, which according to theory is very promising. Here, especially the definition of a required image scale (number of pixels/depicted sample section in cm) seems indispensable for the creation of a uniformed reference pummel scale and a subsequent reliable assignment of the test samples. For this purpose it is useful to use reference images from different manufacturers and compare the results with each other.
Acknowledgements
Open Access funding provided by Projekt DEAL. At this point we would like to thank the following institutions and persons for their valuable support in this work: Marcel Hörbert, laboratory employee of ISM + D, who constructed the Pummel apparatus. Furthermore, we would like to thank the DIBt, which supports us in the project, and the interlayer manufacturer Eastman, which provided us with the test samples.
Author information
Authors and Affiliations
TU Darmstadt, Darmstadt, Germany
Miriam Schuster, Jens Schneider & Tuong An Nguyen
Corresponding author
Correspondence to Miriam Schuster.

