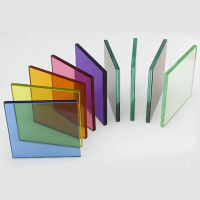
Architectural Glass Laminating Guide - Part 5
By Luc Moeyersons
a. Introduction.
In the architectural lamination industry, laminators started soon to find ways to improve the processing yields and speed.
Since the autoclaving operation is a batch process, within the continuous lamination process, the autoclave cycles and charges have been analysed and changed for quite some time, with various grades of success.
The best way, to my knowledge, is what is known in the industry as “block autoclaving”.
This means that each single laminate is not separated by a spacer but that blocks of laminates are formed in order to increase the autoclave load.
Since increasing the load has an influence on the autoclave cycle, we recommend executing some testing of the autoclave load and cycle, as can be derived from this document. From that stage onwards one can attempt further fine-tuning.
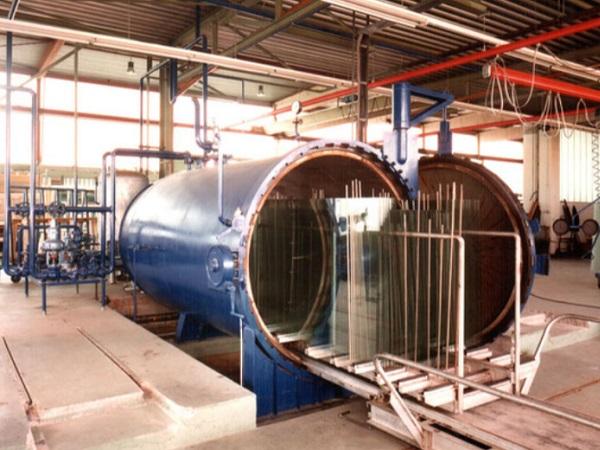
b. Reasons for Autoclaving
During the assembly/lamination step, laminates are de-aired; in other words, air is squeezed or sucked from between the (roughened) PVB and the glass interfaces.
The laminate is heated and pressed, after this ‘de-airing step’, in order to achieve an edge seal to prevent ambient air to enter again into the ‘laminate’.
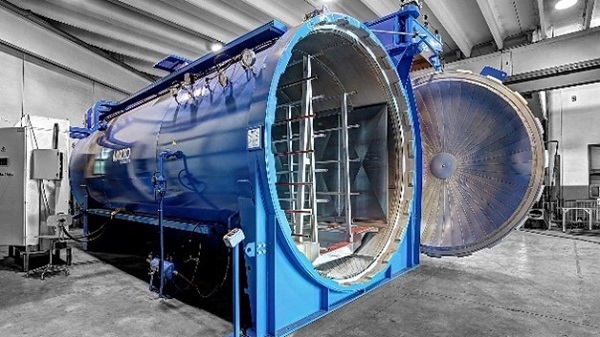
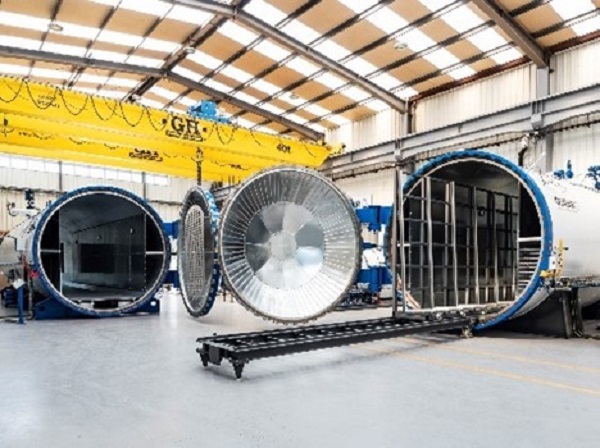
In the autoclave, temperature and pressure are applied during a certain time.
Temperature:
- ensures that PVB flows and adopts fully to the glass (removes eventual polymer stress).
- eliminates the surface roughness.
- sets the final intimate contact and the final adhesion.
Pressure:
- Keeps the glasses in (parallel) position.
- Increases solubility of dissolved volatiles (air, water,…), allowing to reach high temperatures without bubble-formation.
Time:
- ensures that both previous parameters (especially temperature) are applied fully and equally.
c. Comparison between single laminate and block autoclaving
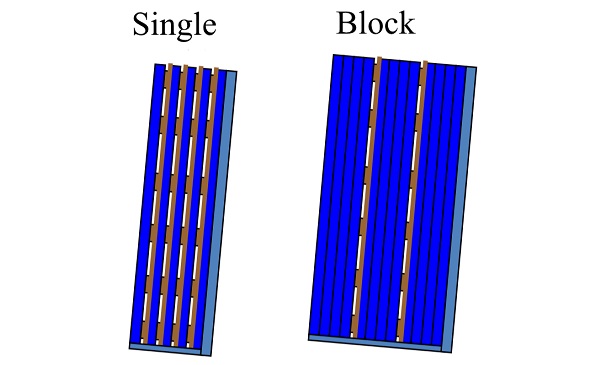
Single Laminate Autoclave load:
In a single laminate autoclave load (architectural as well as automotive), one observes a space of app. 2 cm in between each laminate.
This is done to allow an excellent airflow in between the laminates (horizontal or axial, depending on the autoclave design), as well as to avoid that the laminates would touch one another.
If laminates would touch one another, this would create obstruction of the airflow as well as it might create glass breakage.
Vibration of laminates also needs to be avoided, since this might create edge defects (edge bubbles coming out of solution due to energy load from vibration).
Due to this low load/capacity relationship (glass to air ratio: from 2 to 8 %), an excellent heat exchange can be achieved, but obviously the energy transfer in the autoclave is not ideal. The heating and cooling cycle take more time than the temperature hold step.
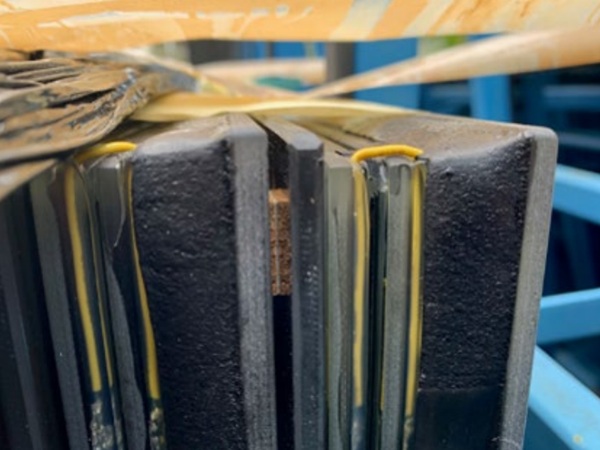
Block Autoclave load:
In a block laminate autoclave load, one needs to observe a space of app. 2 cm in between each laminate block.
The thickness of the block depends on the desired autoclave cycle length, autoclave heating and cooling capacity,… .
A powder needs to be used within the laminate block in order to ensure that the laminates can be removed afterwards (air can penetrate in between the laminates, allowing to take one laminate away from the block after autoclaving).
This block autoclaving creates a higher load/capacity relationship (glass to air ratio: from 12 to 35 %), but as a consequence, with the risk of less good heat transfer around and inside the laminate block.
This might create a delay in glass following the air temperature (and a consequent lower maximum temperature and time) as well as thermal breakage due to a temperature variation within the glass panes.
Advantages and disadvantages:
Single laminate stacking:
+ Allows shorter autoclave cycle due to the lower glass mass in the autoclave.
+ Provide a very good temperature uniformity.
+ And as a consequence, less risk for thermal breakage.
- Creates a lower loading density of the autoclave.
- Pressure spots can create surface defects and optical distortion spots.
Block Stacking:
+ Higher loading capacity
+ Less Energy (per surface unit) due to less heating/cooling steps.
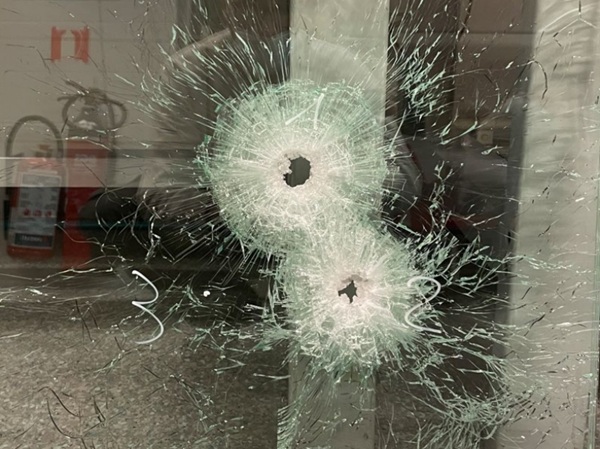
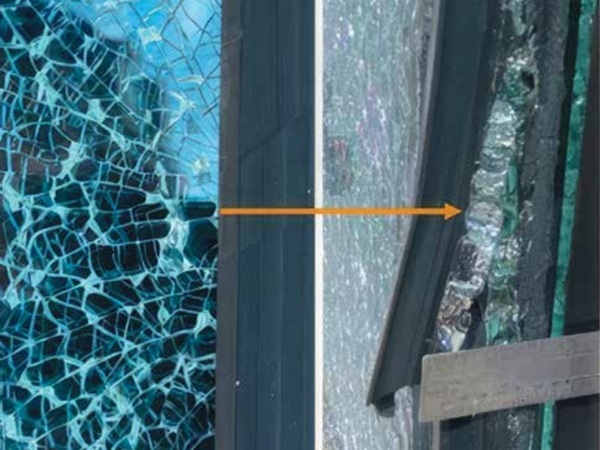
- Higher risk for thermal breakage
- Longer autoclave cycle.
d. Suggested Operational Parameters
– Temperature: 125 to 145° C
– Pressure: 8 to 15 Atm (Bar)
– Time: 30 min. to 12 hrs.
l Soak time: 20 minutes minimum
l Generally longer cycles are used in architectural applications than in automotive cycles because of glass or glass block thickness and the risk for thermal breakage.
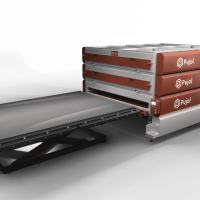
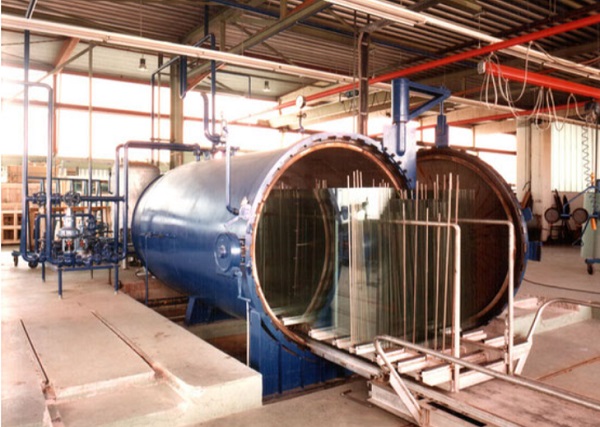
e. Block Autoclaving Rack design
In order to allow fast and safe stacking, the support bars need to be at 2 to 7 degrees from full vertical.
This also allows to store with little pressure (on support points) from the weight of the laminate block.
If the angle would be less than 2 degrees, the risk increases that laminates will fall down on the slightest movement or force.
One needs to ensure that these support bars are all in the same “three-dimensional plate”. Glass would adopt to any deformation and the PVB would keep it in place once it ‘stiffens’ up when cooling down. (such a deformation from 100 % flat can be recuperated by re-autoclaving, supported by a perfectly flat support).
In order to provide a ‘soft’ support one can apply vulcanised rubber to metal sheets (Shore hardness 60–80 Shore A).
This ensures good (thermal) stability.
Such strips are also recommended for the bottom support.
It is advisable to have at least one support bar (bottom as well as back support) per 1.5-meter laminate (support) length, this allows to maintain a flat plate as well does it reduce the local pressure at the bottom supports.
High local pressure at the support edge might create “halo’s” of delamination around the support point. This might be more pronounced with a less good edge seal.
Suppliers of such vulcanised rubber strips to metal sheets are Stakehill (U.K.) and “Productos Salinas” (Spain).
Wooden bars could be used for a short while; but wood carbonises under autoclave conditions and pure carbon will auto-ignite under autoclave conditions.
When the wood turns dark brown to black it is advised to change.
If one would decide to go for wooden supports, the (temporary) use of exotic hard-wood types would be advised.
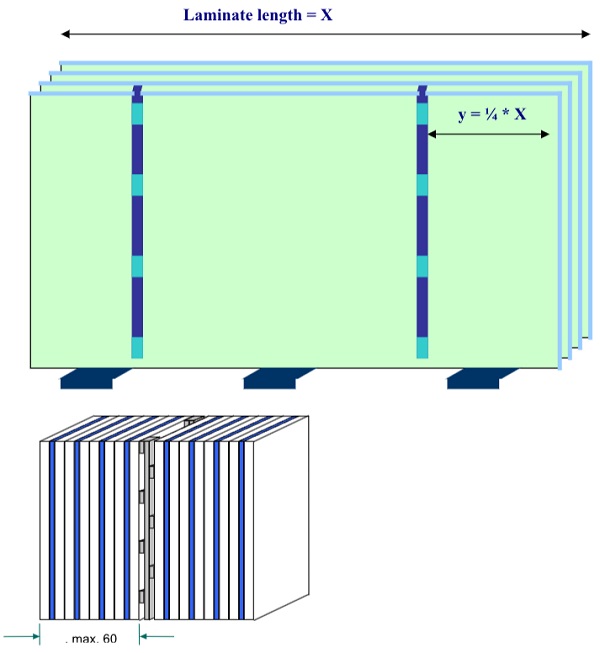
f. Individual Block Thickness
This thickness is depending on the heat exchange capacities of the autoclave.
A maximum of 60 mm is considered practical in the industry.
The minimum temperature/time that ensures a good adhesion (within 95 % confidence level) as well as optical quality (full removal of PVB-stress) is 110 degrees C for 20 minutes.
An ideal (hold) temperature is 135 °C.
The autoclave cycle needs to be adopted so that all laminates at each spot see this absolute minimum.
Evaluations of cycles and the final quality of laminates produced are recommended.
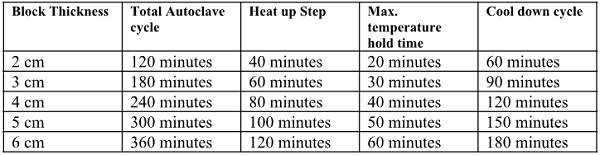
A rule of thumb, derived from several evaluations/measurements is the following:

For each cm laminate block thickness, one needs one hour of autoclave cycle
and one times half an hour as cooling step:
It is also advisable to let the pressure release (when autoclave air temperature is below 40 degrees C) happen over a longer period (> 5 minutes).
A sudden pressure drop at the air outlet might create a large temperature difference and a consequent thermal glass breakage underneath the air outlet.
g. Separating agents within a block.
If laminates would be stacked one next to the other without any separating agent in between, the tiny film of air that would be in between two laminates would be squeezed out by the weight of the laminates as well as the pressure of the compressed air during autoclaving.
Due to this, when one would attempt to remove one laminate from a stack, the next laminate might be lifted as well and only slide down when gravity forces would exceed this ‘capillary force’.
Even when a laminate would be lifted only a few centimetres, when it drops it would be damaged (not to mention the safety risk).
To avoid this phenomenon, people use ‘separating agents’.
These are powders that are applied on one side of the laminate, through electrostatic or mechanical application.
Powders in use are: “coconut powder”, Colacryl P2608 (cross linked polystyrene from Bonar Polymers Ltd.), Separol (Chemetal), … .
For glass lite storage, Lucite Acrylic powder can be used. This powder softens around 125 degrees C and starts sticking to the glass lites. As a consequence, Lucite Acrylic Powder is not a preferred product for this autoclave application.
h. Spacing between the individual blocks — design of spacers
As mentioned earlier, a 2 cm ‘air gap’ between laminates or laminate blocks allows a good heat exchange (sufficient possibility for compressed air to flow in between).
However, if one would have to design spacers that would hang vertically on top of the previous stack, one would need to create a composite that would end up around the same thickness (2 cm).
Such a spacer could exist out of central metal bar (6–8 mm thick) with small blocks (Teflon or Zytel ST) of the same thickness attached to it.
6 to 8 mm thick metal bar (20–30 mm wide) and length close to laminate width.
These small blocks should be put on both sides of the central metal bar in such a way that the air channel would be app. 3 times larger (higher) then the actual block and that blocks at the opposite side of the metal bar should be in the middle of the air gap of the opposite side.
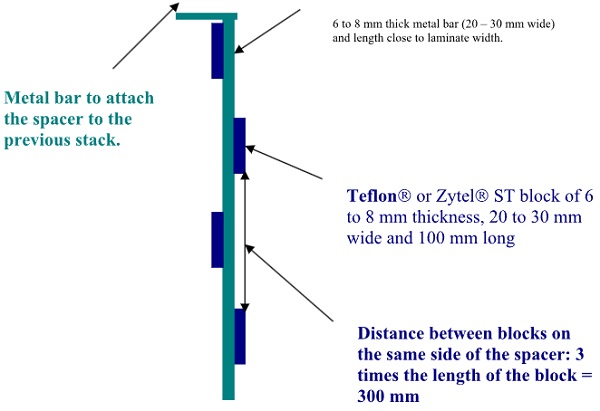
6 mm is the minimum thickness of these small spacer blocks.
If not, the compressed airflow is reduced too much, and negatively influences the heat exchange.
These spacers need to be hung on the previous laminate stack.
A minimum of 2 spacers is needed, they need to be hung at app. ¼ of the total laminate length away from edge vertical edge.
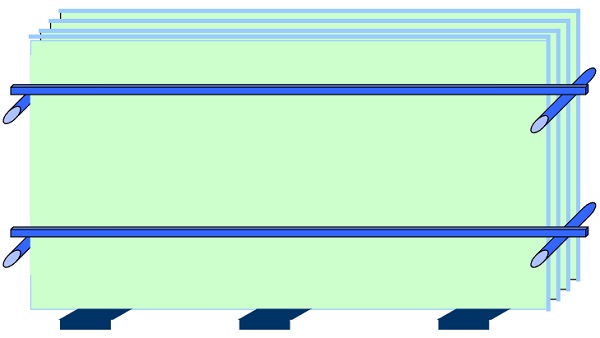
For automated systems, one could modify the spacers in such a way that they can be applied automatically with the vacuum suction systems as used to put the laminated glass into place (note that the laminated glass needs to be of equal size).
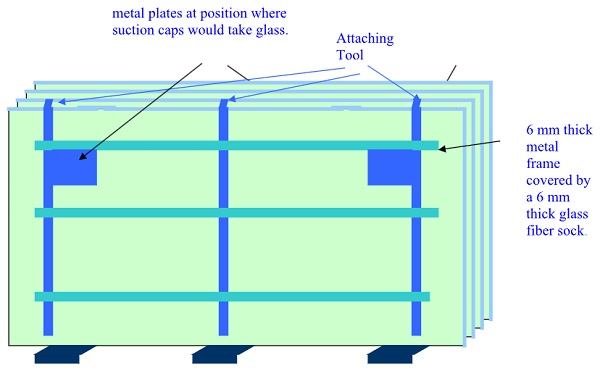
For automated systems, one could modify the spacers in such a way that they can also be applied manually with little additional effort (note that all laminated need to have equal size (length)).
i. Autoclave Cycle
As already mentioned in section “f” (Individual block thickness), we can suggest the following autoclave cycle:
For each cm laminate block thickness, one needs one hour of autoclave cycle
and one times half an hour as cooling step:
It is also advisable to let the pressure release (when air temperature is below 40 degrees C) happen over a longer period (> 5 minutes).
To reduce the risk of edge defects, one could decide to modify the autoclave cycle into a “Olson-Fitzgerald-cycle”.
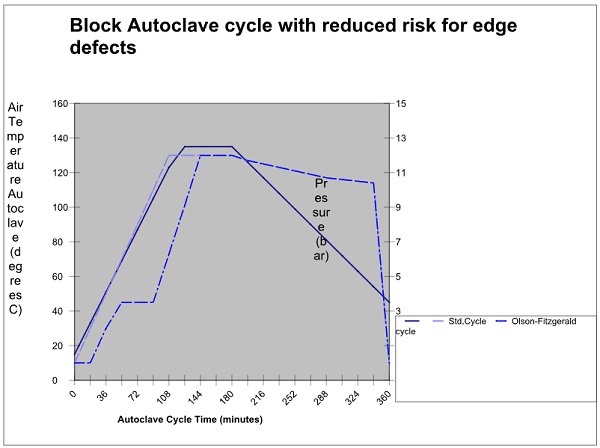
The autoclave is heated without pressure.
Pressure is added from 60° C onwards, till 3.5 bar.
This way one obtains a 3rd nip, improving the edge sealing.
The 3.5 bar pressure is maintained for at least 20 minutes while heating still continues.
After (minimum) 20 minutes the pressure is increased.
The goal is to reach maximum temperature and pressure at the same time (energy efficiency).
Maximum temperature and pressure are held in line with advised time (related to pack thickness).
When the cooling is started, one would expect an automatic reduction of pressure (adiabatic pressure drop) of app. 2 bar. Some autoclaves are set to compensate for this pressure drop.
If the autoclave is equipped with an automatic pressure compensation, one could program a 2-bar pressure drop over the cooling step.
Maintaining pressure (at its maximum setting) is not really needed and is rather costly (high pressure step).
Pressure should drop when 40° C autoclave air temperature is reached (over a longer time > 5 minutes).
If still warm spots can be noticed (middle of laminate in the middle of the pack), one can leave the autoclave door open with the load inside.
In an hour time, the glass should cool off more and this in a more uniform way.
j. Temperature/Hysteresis control
Most autoclaves are equipped with multiple thermocouples for process control.
These thermocouples are connected to the process controller and often hysteresis limits are set to 0.5 degrees C.
This means that ALL thermo couple read out need to be within this 0.5 degree tolerance.
If not, the system stalls till the condition is reached (all temperatures within a 0.5 degrees C limit).
This means that the cycle is taking longer then programmed.
This phenomenon happens often in autoclaves with block loading.
One can decide to evaluate the autoclave cycle and adopt the length in time to the real lifetime need of the full autoclave. But this does not help to shorten the autoclave cycle (and brings the processing time back into the required time frame).
Or one can (check with the autoclave producer) modify the hysteresis to 2 °C (even 5 °C). This should allow continuous heating and cooling and ensure a “correct” autoclave cycle duration.
A 5 °C temperature variation (within the same autoclave load) should not have a negative effect on the laminated glass quality.
k. Autoclave cleaning/purging cycle
During a period of 5 years, I studied (frequent) autoclave fires.
According to my analysis/conclusion, most of the fires were caused by evaporated PVB plasticizer, excessive grease/fat, carbonised wood or paper, one time even by a cigarette butt…
PVB plasticizer: in previous generation PVB’s, one large producer used DHA (Di-Hexyl Adipate) as plasticizer (CAS number: 103–23–1 — EC number 203–090–1). This ester has a lower flash point than current PVB plasticizers.
When analysing the (interior) autoclave insulation material this plasticizer was found in large quantities. This is far less the case now that most global PVB suppliers have changed to Tri-ethylene glycol octanoate (CAS number: 94–28–0; EC number: 202–319–2) as plasticizer.
In all my analysis of autoclave fires (> 25), most of the time the fire started at the cooling step.
The explanation: volatiles were present, a spark could come from electrical heating and oxygen was added to compensate for the adiabatic pressure drop.
Another cause of autoclave fires could be local liquid (oil/ fat/ dripping plasticizer/… (or even (carbonized) wood or paper), can be accumulated locally and can catch fire (below the autoclave cart rail). Best would be to avoid interior autoclave insulation between the rails to allow regular check up and cleaning (some autoclaves have a liquid collection reservoir) sticking out of the autoclave (cold spot) at this place)).
NOTE: paper or wood will carbonise during several autoclave cycles. Carbon, under autoclave conditions, can spontaneously ignite and create an autoclave fire.
One can “predict” the time/risk for autoclave fires by regular (6 months(?)) autoclave insulation analysis.
The place where the insulation for content analysis is taken is very important.
Usually, the spot above the radiator is most representative for the rest of the insulation (except when local accumulation).
More then 20 % volatiles in gravimetric analysis (evaporated between 75 and 500 °C) (chemical component analysis through Gas Chromatography) is considered an alarming level, requiring urgent replacement of interior autoclave insulation.
Prevention of volatile accumulation to avoid autoclave fires.
Many “autoclave cleaning cycles” exist.
The one that I would like to propose is:
· The same cycle length and temperature as a commercial autoclave cycle.(the longest if more than one cycle type used)
· Open the pressure evacuation valve (manually) and apply a low pressure (0.1 to 0.5 bar), creating some airflow.
· Perform this cleaning cycle, once per week.
· Close the valve manually again after the cleaning cycle.
Volatiles will, during previous autoclave cycles, have “settled” at the inside of the autoclave body shell (inside the interior insulation). Air pressure would keep them dissolved inside the insulation during a regular cycle. During a non- to low-pressure cycle, the volatiles would become “air-born”.
The low air pressure together with the open pressure evacuation valve will create an air flow towards the outside.
One can always check if the cleaning cycle is functioning: during the cycle, one can hold a clean paper tissue in front of the evacuation exhaust. If the tissue becomes dirty/fatty, volatiles are evacuated through this exhaust. But it also means that cleaning cycles need to continue.
A good frequency is one cleaning cycle every week (at the end of the work week?).
Autoclave cleaning cycle: time length of the longest autoclave cycle used at regular (maximum) temperature with low pressure (0.1 to 0.5 bar) with air pressure evocation valve open.
Note: Do not forget to close this valve at the end of the cleaning cycle and before commercial autoclave start.
*****
Pictures are shown with reference to the source of the picture.
If the info is wrong, please contact author with correct info for document correction.
This information corresponds to my current knowledge on this subject. It is offered solely to provide possible suggestions for your own experiments. It is not intended, however, to substitute for any testing you may need to conduct to determine for yourself the suitability of our advice for your particular purposes.
This information may be subject to revision as new knowledge and experience become available. Since we cannot anticipate all variations in actual end-use conditions, LAMI Solutions makes no warranties and assumes no liability in connection with any use of this information.
Nothing in this publication is to be considered as a license to operate under or a recommendation to infringe any patent right.